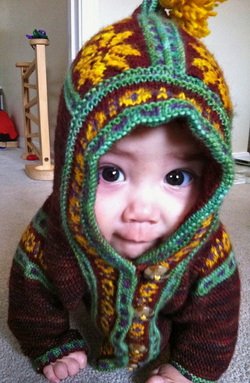
This is a repost of an entry I did approximately 3 years ago which was, mostly, about the sweater that Joe is wearing. But there's also quite a bit about the hat....which is exactly the same hat that I made for Adam this fall. Same construction method, same principle for reduction, but this one is felted so consequently was originally 1/3 bigger and also knit up with a finer yarn. I believe at the time I referred to it as Joe's Interminable Hat. I should probably work up an actual pattern for people from Newborn to Big Man size. 
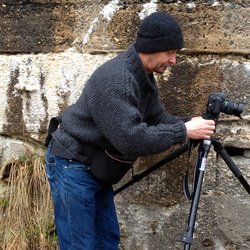
Joe and I went out for a drive today to look for interesting places to photograph. As you can see here both Joe and I found a few interesting things. He is taking pictures with his super hi-price pro digital camera complete with a large pack of accessories and an enormous tripod. He is taking pictures of the Saco River and I am taking pictures of him -- but I am using my I-Phone. I wanted you to see the sweater. I made this for him this winter and it is, I am embarrassed to say, the first sweater I have ever made him. Since we have been married almost 25 years I have no respectable excuse to give you. In my defense I did make him the hat. Let me tell you about that hat. He wanted a felted hat that was windproof. It should also not be the least bit scratchy. And it had to be black. I knit that hat out of recycled cashmere and merino (both black) and neither one the least bit scratchy. Recycled yarn is obtained from unraveling sweaters, so the yarn is fine and crinkly. Also, in order to felt something to size you have to make it at least 1/3 bigger in all directions than the finished product. So, between the fine crinkly yarn, the completely black color scheme, the enormous size, the tiny stitches and the complete lack of anything interesting going on in the way of pattern or anything else this hat is the equivalent in interminable knitting of at least one sweater -- quite possibly two. 
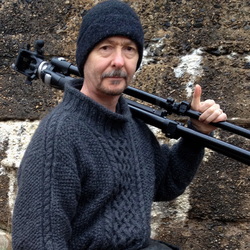
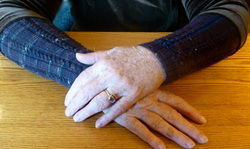
The good thing is that he loves the hat and has worn it almost constantly for the last 7 years. So it seemed he had earned a sweater. I want to point out the nice way that the cable runs across his shoulders and down the arm. I believe while I was taking pictures I also commented on how splendid the sweater looked from the back, adding that he always had a very nice rear aspect. That is what elicited the look that you see here. I believe he is wondering what exactly I might be implying and, perhaps, how best to follow up.
3 Comments
If you look at the entry below you will see that I saw my friend Berta's Pinterest posting for an afghan design that she wanted to try....if she could only find the pattern. I took a look....it was a slow rainy Sunday afternoon with lots of sitting around watching movies in the plan, so I grabbed some scrap yarn and gave it a shot. This is what I came up with, and the pattern to make these little squares is available to you in the entry that I made just prior to this one. I ran out of the variegated yarn after I had completed 6 squares, although there was still plenty of purple left. So I left it laying around for a bit on the table in the studio, which is my favorite spot to leave things that I want to think about for a while. It occurred to me while I was watching a Netflix movie and knitting that the size of the knitting sample was almost perfect for the side and fold over section of the I-pad. So I knit an I-cord border around the whole thing and then used some of my ENORMOUS stash of rug wool to make an I-Pad cover sleeve which I then sewed the knitting sample to as a kind of decorative cover/extra padding. As you can see here, I also added a little pocket at the base so that you can roll up the whole shebang, tie it off with the green ties and have your I-Pad at the perfect level of Prop for reading or viewing. Plus I find that when I sit down to read a nice novel with my cup of tea the customary I-Pad covers are a little....technical in feel. This knitted, wool backed cover gives the whole experience a nice, cozy, nestling in feel that is more conducive to maximum relaxation...at least for me. My friend Roberta posted a picture to Pinterest under Things I Want to Try. I looked at the picture and shot her an e-mail offering to write up the pattern so that she could try it. This is a photo of my version, using the scrap yarn that I had on hand. I used a worsted weight yarn and a size 5 needle. This would be a great pattern to use as your Carrying Around Knitting, particularly if you do the Bow Ties in Stash Scrap Colors (or hand dyes, or handspun) and use a unifying color like black, or white, or grey, or brown in the place of the purple. I recommend that you just carry around the directions for the Bowties and wait until you are sitting down at home to knit up the little quadrilateral Inserts and do the sewing up while you are comfortable. Bowtie Pattern: Cast on 20 stitches using a flexible cast on method. I Knit On myself, but any method that doesn't result in a hard stiff edge is fine. Knit one row. At the beginning of the next 12 rows Slip 1, Knit 1, Pass the Slip stitch over, Knit to the end of the row. You should have 8 stitches on your needle. Slip the first stitch and knit to the end of the row for the next 16 rows. Now to do the last increasing bit. Knit into the front and back of the first stitch and then knit to the end of the row for the next 12 rows or until you have 20 stitches on your needle. Bind off with a flexible bind off method. This is a good one. Knit 2 stitches then insert the tip of your left hand needle back into the 2 on the right hand needle and knit them together. Knit another stitch. Repeat. Quadrilateral Insert Pattern: Once you get a few of the Bowties done load up a movie or your favorite music and start to knit the Inserts and assemble your squares. Cast on 20 stitches and knit one row. Knit 2 together at the beginning of the next 12 rows. You should have 8 live stitches left on your needle. Break off the yarn leaving about a 20 inch tail which you thread onto a darning needle. Sew the live stitches down, one at a time, to the straight edge at the narrow part of the Bowtie. Use a mattress stitch to join the angles of the Bowtie and the Insert together. Use the bit of yarn left from when you cast on to sew up the other angle. Repeat for the other side, and then over and over as many times as you have little Bowties. Sew the squares together using a mattress stitch as well. The mattress stitch keeps things flexible....you don't want hard edges....everything should be kind of stretchy. Pat Dunn made four pair of these fingerless mitts for her daughters and daughters-in-law for Christmas. Much to my chagrin, it has been a very long time since I took these pictures and I have been very delinquent in posting them. I particularly like that she spread her sock yarn colors around, mixing and matching and adding a few yards of a couple of her stash colors to make each one individual. They are photographed in the kitchen on top of the old butcher block table that I inherited from my Dad. If you would like to make some of these yourself the pattern is available under Patterns as Seasons Greetings Gloves and Mitts and on Ravelry, along with a pattern for long Greta Garbo style gloves that you can make to wear either separately or underneath the fingerless mitts. Here is a picture of Samahra receiving her Christmas Doll. Her parents stayed with us through Airbnb this past summer and talked about getting her a doll for Christmas. They sent me photos so that I could make a doll that resembled her and then, after the holidays, they e-mailed me a whole series of pictures showing her opening her present and receiving her doll into her loving and open arms. To read more about the whole process click through on Pattern under Categories and go to the entry that I did in December before I mailed the doll off to her new home. Here I am at the SEA Holiday Sale sitting and spinning behind what appears to be a very large bear. Actually this bear is only 8 inches tall, but that is what perspective can do to you. These bears are made from an old cashmere sweater that had seen better days as a sweater but had plenty of life left in it as bear pelt. They are stuffed with wool and are very dear and fuzzy. I have only three left at this point so come by and see me at the East End School this weekend if you feel you need one. I take my spinning wheel with me to these events because 1) it makes me pleasant and cheerful which is desirable when dealing with the public, 2) it's show bizzy and tends to draw people to come over and talk to me and 3) it's productive, leaving me with 2-4 hanks of hand spun yarn at the end of the weekend which pleases me. And here is a shot which shows the dolls again, along with a bag that I made from the endless supply of rug wool, some of my patterns and a glass vase full of hand spun yarn. Most of the yarn that I sell has been hand dyed and I have over dyed the rug wool as well when I thought I could improve the color. And here is another angle where you can see hand knit mittens left over from classes I have taught this year, hand dyed rug wool and a partially completed braided rug and the Little Red Christmas Birds. I am disproportionally proud of the birds. They are made from an old merino sweater but it is the bird filling that really pleases me. You know those little scraps of yarn that some of us are constantly setting aside in a pile because we might eventually "find a use" for them? Fess up, I know some of you do this too. I have finally discovered a use -- bird stuffing. I appear here to be staring dreamily at my own feet, but the photo above proves that I am actually spinning. The dolls in the pictures below will be appearing this weekend at the Holiday Sale for the Society for East End Arts. I no longer have my studio in the East End but I am grand mothered in. I will have a booth there on Friday evening, Saturday all day and Sunday morning where I will be selling these dolls along with hand dyed yarn and woolen felt and fabric, knit goods, patterns, hand spun yarn and roving and, as usual, I will also be dispensing whatever wise fiber advice you are willing to stand still and listen to. I hope to see you there. Otherwise it will look like I am talking to myself..... Here I am sitting at Bintliff's which is, according to my son Blake and me, the very best breakfast place in Portland. My arms are adorned with Stulpin, which are European knitting garb intended for either your forearms or your legs. We had two guests from Germany staying over in our Airbnb room and I was knitting knee socks as we chatted over the breakfast scones in the studio. One of the ladies wondered if I could make the socks without feet. It took us a while to figure each other out, what with her not so good English and my much, much worse German, but we managed. The results are these Stulpin, which are now with her in Munich keeping her forearms, or her legs, warm through the cold European winter. This is a closer view of them showing the little mock cables that I put on my particular version. I will post a pattern on Ravelry and on my Etsy site if you want to make them exactly like mine but if you are a sock knitter almost any rib like pattern that you would use on socks will work nicely. Color work might not be stretchy enough for arms and legs, particularly if you have working class calves like mine. This is Samahra's Doll. Her parents Tiffani and Yuri came to see us at the Airbnb room that we have here at the top of the stairs and saw one of my dolls while we were having breakfast in the studio. After they returned home Yuri sent me some wonderful photos that he had taken of my studio and also a request that I make a doll for Samahra. He sent me some photos of Samahra herself so that I could do justice to her lovely face and cornrow braids and this is the finished product....just in time for Christmas. This photo is taken in the kitchen in my pot of sage and parsley, which seemed like a good idea at the time but has resulted in some flare on the lens. Nevertheless it is a good shot of the dolls little face. And here is a beautiful picture that Samahra's parents sent to me of her pretty face after she had opened her Christmas present. It was a wonderful post-holiday surprise for me to receive the e-mail from Yuri and Tiffani with these pictures attached. As you can see Samahra knew exactly what a Christmas doll needs most, which is a loving welcome to the family hug. I really focus on creating dolls that feel at least as good as they look and it appears that for Samahra it was a successful effort. Tiffani and Yuri also sent me some pictures of Samahra before I started her doll so that I could see the way her mother braids and arranges her hair and try to duplicate that for her. So Samahra's doll as cornrow braids attached to a crocheted cap and the braids can even be rearranged a bit so that they tie at the side or the back. Samahra was evidently quite tickled with the braids. I also really concentrated on giving the doll big dark brown eyes, a wide button nose and a full rounded mouth so that she would have a family resemblance to Samahra. I really enjoy making the dolls, but I particularly like making them for a special child. This was such a fun project for me, and seeing the photos from Christmas morning made the whole thing even more meaningful. This is a picture of my beautiful... um...relative. Nico is the second son of my nephew....what do you call that kind of relative? In any case he is beautiful and he is winsomely modeling the sweater I made for him before he was born. This is a version of the Hooded Sweater for Everybody made with hand dyed sock yarn so it is warm and entirely washable. Based on his parents I assumed a dark haired, dark eyed baby and as you can see I assumed correctly, which doesn't always happen for me. There was, of course, no way of anticipating the awesome adorableness of Nico himself. He is a darling baby boy and is, in this picture, approximately 6 months old. If you would like to make a version of this jacket for your own charming relatives it is listed on the pattern page here and on Ravelry here. If you do decide to work one up please send me photographs. You really just can't have too many of these cute baby pictures. |
About Martha
Archives
February 2019
Categories |