
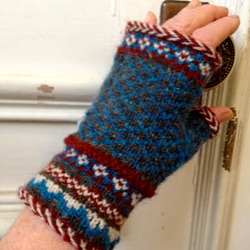
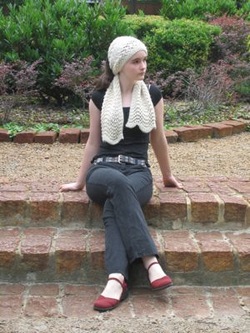
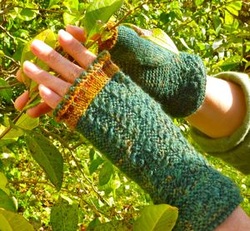
The pattern for these Latvian Braid Fair Isle Mitts can be found on Ravelry. They are made from Peace Fleece DK yarns which is a 80/20 wool/mohair blend which blocks beautifully and fluffs up like a champ. The colors are lovely heathery blends that range from muted to bright. There are several tricky bits here; you have to have some experience with knitting in the round, it is helpful to have some experience with working with two colors as well. There is a combination of oatmeal knitting for the facings, simple two color knitting with never more than 3 stitch skips so you can weave in or not as you please, and the Latvian Braid. Let me tell you a bit about that. It is a show offey technique that is simpler than it appears, although somewhat annoying. There is a set up row, and then two "braid" rows. The bottom braid row will result in your yarns twisting together which is the annoying bit. The top braid row will untwist your yarns. The annoying bit is, for me, short lived and worth it for the end result. The braid also provides a nice crisp edge for turning the facings at the top and cuffs, which will keep the mitts from rolling into the palms of your hands with use. I have several pairs of these but find I need to steadily make more since love people keep stealing them right off my hands!
The Wedding Socks
This pattern is for two socks, a Groom's Pair in DK wool, and a Bride's Pair in fingering weight. I used just over three 50 gram, 137 yard balls of Dove Grey Sport Weight wool from Knitpicks. Scott, my nephew, comes from the land of the Yeti and his socks are a sizeable size 13. You will need to buy 4 skeins to be sure to have enough. If you have a more reasonably footed object of your affection you can get away with three easily. The pattern for the Groom socks supplies instructions for sizes Men's 6-13. The Bride's Socks, in this case Elizabeth, are a very moderate size 7-8 and differ from the Groom's socks only in that there is the delicate lace top cuff which is based on an 1880 knitting pattern that I got out of Knitted Counterpanes. These socks are knit up with Stroll Tonal Sock yarn in Pearlescent, which is a color that has been discontinued. It was a 100 gram skein with 462 yards which is ample for these socks. You could think about substituting white or the Dove Grey Stroll from the same source but get 2 of the 50 gram skeins. I like the heavier yarn for the Groom Socks and the more delicate sock yarn for the Bride's; but you could also make them with the same yarn, in which case I recommend going with the Sock Yarn. This pattern is available on Ravelry and Etsy. Just click on the buttons below.
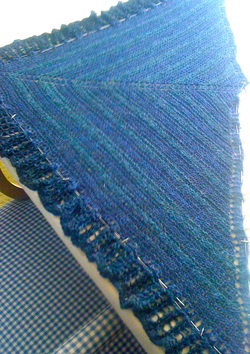
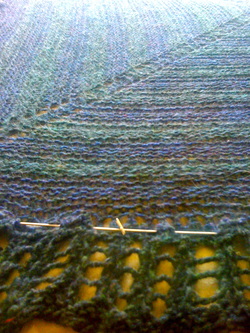
My Ancestress Lace Hap Shawl
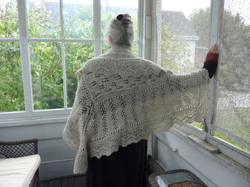
I wrote up the pattern for my Shetland Lace Hap Shawl and have now posted it to Ravelry and to my Etsy site. You can see the buttons to purchase it below. So if you have been longing to make one for yourself the written directions are now available and once again, as is my custom, because it is a PDF download I feel free to go on and on at length. This means I can include more intensive guidance about where to put your markers, how to work a lace pattern into a miter, and how to knit on a wide lace border and make the corners look good. I also include some helpful hints on blocking.
I would also like at add that, on a personal note, this particular shawl is my favorite created thing in the last year or two. I couldn't figure out whether it was the fact that I hand spun the yarn from a lovely Shetland sheep of my acquaintance, that it appears to be the exact same shade of grey as my own hair, that the finished shawl is so lightweight, warm and feminine. and then finally I figured out that it was the feeling that I get when I wear it that I have somehow always had a shawl just like this....that at least I had created something that I was always supposed to have. And that is what led me to name it My Ancestress. I think my fore mothers, as it were, created and wore shawls just like this and created them in pretty much exactly the way that I created this one using these lace patterns or lace patterns very similar, and quite possibly had the same shade of grey hair as my own. I like to think about it when I see it draped around in the studio and especially when I am wearing it. You don't need to make it with handspun yourself, of course. But I do recommend you use a nice heathery fingering weight wool, which would be in keeping with the whole spirit of the thing.
I would also like at add that, on a personal note, this particular shawl is my favorite created thing in the last year or two. I couldn't figure out whether it was the fact that I hand spun the yarn from a lovely Shetland sheep of my acquaintance, that it appears to be the exact same shade of grey as my own hair, that the finished shawl is so lightweight, warm and feminine. and then finally I figured out that it was the feeling that I get when I wear it that I have somehow always had a shawl just like this....that at least I had created something that I was always supposed to have. And that is what led me to name it My Ancestress. I think my fore mothers, as it were, created and wore shawls just like this and created them in pretty much exactly the way that I created this one using these lace patterns or lace patterns very similar, and quite possibly had the same shade of grey hair as my own. I like to think about it when I see it draped around in the studio and especially when I am wearing it. You don't need to make it with handspun yourself, of course. But I do recommend you use a nice heathery fingering weight wool, which would be in keeping with the whole spirit of the thing.
Amusing Christmas Balls
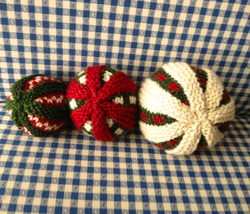
I have posted a pattern on Ravelry for working up these balls. The pattern includes all three sizes (2", 3" and 4" diameter) and some helpful hints for thinking about Kitchener stitch. This is a great pattern for using up yarn scraps, and you can even use your fabric scraps for stuffing -- I do. This is a pattern I designed for middle school kids when I was homeschooling, so it is pretty straightforward. Middle School boys were particularly delighted with the end product and were tempted to persevere through the knitting phases, egged on by the color changes and the desirability of having something to toss around the school room table.
Doll Cardigan and Hat for Maisy
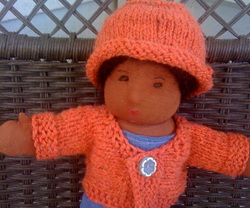
This is a simple hat and cardigan knit from basic worsted yarn on a size 3 needle....double points for the hat, straights or circular for the sweater. It requires about 150 yards of worsted yarn and is designed to fit the 15 inch soft bodied Waldorf style dolls that I make. It was created to give Maisy the doll a little variety for her wardrobe and some warmer clothes for the cold Maine winters. This is a very simple pattern and could easily be scaled up to fit a child, providing you have the child's vital measurements. It is available to purchase for $3.00 through Ravelry, and through my Etsy store, or just by clicking on the Buy Now button below. It is available as a downloadable PDF. I am, however, very interested in communication and would be delighted to advise you if you have questions once you begin to work the pattern up, if you wish to scale it up to make matching doll/doll mother sweaters or to help you if you have trouble with the downloading process.
DNA Mitten Pattern -- Free
DNA Mitten Pattern
I have been knitting since the age of 4. We had a big family with many children in Maine, so one of the very first things I learned to knit was mittens. I am going to try to analyze and clearly describe a process that is encoded on my DNA, hence the title. This is a basic, solid color mitten with no tricky pattern stitches or other flummery. You can add that to your future efforts once you have made a pair or 10 of the basic sort. These make excellent Christmas gifts for children. I often make them in sets of 3 so that a lost mitten is no catastrophe.
If you have never made mittens before I recommend that you make the first pair for yourself. This is mostly because you have your hands right there in front of you, knitting , and that makes them handy for trying on and test fitting. Once you are familiar with the process you should be able to grade the whole business up or down to fit hands that may or may not be right in front of you.
For the purposes of general descriptions these are the approximate measurements for mittens above the line of the cuff for the various sizes of human beings.
Child
Small - 5 inches around and 5 inches long
Medium - 6 inches around and 6 inches long
Large - 7 inches around and 7 inches long
Adult
Small - 7 inches around and 7 inches long
Medium - 8 inches around and 8 inches long
Large - 9 inches around and 9 inches long
Now your human beings may come in non-standard sizes with long narrow hands, or wide baseball mitt shaped hands so accommodate to your people, don’t blindly follow the measurements. One of the advantages of hand made as opposed to mass produced mittens is that you can make your mittens one at a time to actually fit the person, who has also, usually, been made one at a time.
First question.....what kind of yarn are you using? If it is worsted weight then you will get approximately 5 stitches per inch. If it is DK or sport weight then you are probably looking at 6 or 7 stitches per inch. If it is fingering or sock weight yarn then we are talking about 8 or 9 stitches per inch. The weight of the yarn has more to do with the gauge then we usually think, and the needle size has less. Mittens are best when knit at a fairly close tension so use a smaller size needle then you usually would. Here is another general list.
Worsted Weight - needle size 4-7
DK or Sport - needle size 3-4
Fingering or Sock Weight - needle size 0-3
I’m going to assume that you are knitting your mittens on double points since that is the way it is traditionally done. It can be done on two circular needles, or one long circular needle either singly (one mitten at a time) or for the adventurous doubly (two mittens at a time). I am going to assume that with your first pair you are not going there, although it does give you something to aspire to.
Work up your gauge. Cast on 20 stitches and knit on the front, purl on the back side for about an inch or so. Now measure how many stitches you are getting to the inch. This is your key number which we will abbreviate as N. If you are using worsted weight N=5 in all probability.
Take your number N (I am going to assume it was 5) and multiply that by the number of inches around your hand (I am going to assume 8 for Adult Medium). Multiply N by your measurement to get the approximate number to cast on. (5x8=40)
Making the Cuff
Fudging takes place here. I like to use a Knit 2 Purl 1 rib on my mittens for the cuff. This rib is stretchier and allows for a little elegance of construction when we do the thumb gusset later so just go with me here. 40 is not divisible by 3, but 39 is. I would cast on 39 stitches and Knit 2 Purl 1 for one row. Do not join first as you usually do. This creates a little ridge for your first row that makes it easier to join without twisting because you can see what you’re doing. Now place 13 on each needle and join. I like to start every needle with a knit stitch because it makes the knitting of the cuff more automatic pilot for me and requires less paying attention, so do that too.
So now we have 39 stitches in all, split into 13 stitches on each of 3 needles, each one beginning with a Knit 2. Do Knit 2 Purl 1 ribbing until the cuff is as long as you want it to be. For children 2-3 inches is usually good, adults may want it a bit longer, say 3-4 inches.
Setting up for the Hand and Thumb Gusset
We are now going to divide our number of stitches roughly in half. We will reserve 20 stitches for the front of the hand, so place 20 stitches on one needle. Split the other 19 roughly in half, placing 9 on the first “short” needle and 10 on the other, but pay attention to where your Purl and Knit Stitches are. We want to have a Purl 1, Knit 2, Purl 1 section at the beginning of the 9 stitch needle. We are going to use that section to make the thumb gusset and if you do it my way you will have an elegant line of purl stitches that goes all the way from the base of the cuff up each edge of the thumb gusset. It is a small thing that in no way affects the utility of the mitten, but it amuses me so I am telling you about it. From now on all stitches will be knit with the exception of the Purl stitches on either side of the thumb gusset.
Beginning with the 9 stitch needle and a purl stitch, Purl 1 Knit 2 Purl 1 and then knit until the first round is completed. You may want to increase up to 4 stitches in this first plain knit row, depending on the shape of your hand. A long narrow hand won’t require any increasing. A broader hand with a narrow wrist would benefit from a few extra stitches above the cuff. Continue knitting around and maintaining the Purl 1 Knit 2 Purl 1 base for the thumb gusset for 2-4 rows. Now we are going to start increasing for the thumb.
Thumb Gusset
Maintain the purl stitches going all the way up the edges of the gusset.
Row 1 and all odd number rows): Purl 1 Make One by knitting into the stitch below, and then into the stitch on the needle. (Right handed make one) Knit whatever is in the middle here which on row 1 will be 0, on row 3 will be 2, on row 5 will be 4, etc., etc. Make another one by Knitting the stitch on the needle and then into the stitch below (Left handed make one). Purl one. Knit plain for the rest of the row.
Row 2 and all even number rows. Knit all knit stitches and purl the two stitches on the outside edges of the gusset. Do not increase on even number rows.
Keep this up until you have increased 10 stitches and there are 12 knit stitches in all between the purl stitches on the outside of the gusset. Run a length of contrasting yarn through these stitches to hold them and cast on 4 stitches to close the gap. Now just knit around until your mitten is an inch or so shy of your final measurement, in this case 7 inches above the line of the cuff.
Setting up to decrease for the top of the mitten.
Check your thumb position. Look at your the hands palm up. When you are looking at the palms of your hands, or your mittens, the thumb is on the right on the right hand, and on the left on the left hand. Place your stitches so that you have half your stitches on one needle for the front of the mitten and the thumb gusset is on the right side for the right mitten or on the left side for the left mitten. This may require some initial fussing around with your double pointed needles to get things placed properly. Just move your stitches around until you it is correct and then place your 4th double pointed needle wherever it needs to be in order to begin to knit again. Knit 1 round ending up on one side or the other of the front of the mitten. You should have 1/2 of your stitches on one needle, and 1/4 of your stitches on the other two.
Round 1 Side 1 - Knit 1 stitch, PSSO (this is done Slip 1, knit 1, pass the slipped stitch over the knit stitch -- henceforth referred to as PSSO), Knit until you are within 3 stitches of the end of this side. Knit 2 together, Knit 1
Round 1 Side 2 - Do the same thing.
Round 2 and all even rounds - Knit all stitches
Round 3 and all odd rounds - Same as round 1
You will notice that on the odd number rows you are decreasing a total of 4 stitches each time. When you reach the point when you have 6-8 stitches left on each side you are ready to close the top of the mitten.
You can Kitchener stitch it together which is what I do because it is tricky and looks good.
You can do a 3 Needle Bind Off.
You can just cast off and sew the top of the mitten together.
If you decide to Kitchener stitch the tops together then just put the first mitten’s top stitches on a length of contrasting yarn and complete the other mitten so you can finish them both at once. It is easier to remember how to Kitchener stitch when you are doing both at once rather than one, and after a long time passes, another one.
Finishing the thumb
Pick up the 12 stitches on your thumb, and then pick up 4 more where you “cast on 4 stitches to close the gap”. Spread them out with 5 stitches on each of 3 needles, knitting two together where necessary to close up the little hole that is always cropping up at the base of the thumb join. Knit around and around until the thumb is long enough, approximately 2 inches for adult medium, but thumbs differ so feel free to try the mitten on to check.
Closing off the top of the thumb. PSSO at the beginning of each needle and K2tog at the end of every needle. You should have 3 stitches on each needle now. Slip 1, K2tog, Pass the slip stitch over on each needle. You now have 3 stitches left, 1 on each needle. Break off the yarn and, using a darning needle, thread through the middle of each stitch and pull gently to close up the hole. Work your end in and cut the tail of yarn off so it doesn’t hang there foolishly.
Elizabeth's Pi Are Square Shawl and What I Did
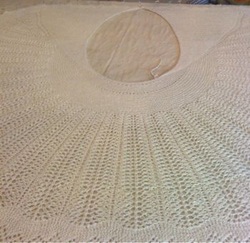
The bad news is that I'm not going to give you the directions to Elizabeth's Pi Are Square Shawl because she covers it herself beautifully in her book Knitting Around which is currently on sale at Knit Picks and has not only this wonderful pattern but many others and also some very amusing writing about Elizabeth's life. The Pi shawl is a relaxing knit with plenty of garter stitch, and yet still has enough room for innovation to keep you awake. It is a perfect blend of Oatmeal Knitting (comforting and bland) and Thinking Woman's Knitting (Lace, shaping and keeping your wits about you). It is also an excellent shawl for wearing because the shape and the weight keep it on your shoulders without you having to be constantly clutching at it. I use mine out amongst the people and in the kitchen over my nightgown. It is very useful to me.
So, buy the book, or borrow it from your library or another knitting friend. The book is excellent and not terribly expensive and if you do borrow it your going to end up buying it anyway, but whatever works for you.
So, buy the book, or borrow it from your library or another knitting friend. The book is excellent and not terribly expensive and if you do borrow it your going to end up buying it anyway, but whatever works for you.
General Directions for Martha's Pi Shawl Interpretation
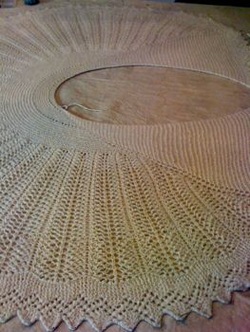
So this is what I did. Work the Pi Shawl according to directions until you get past the 3rd increase row (K1, YO). Now set up a feather and fan stitch that goes like this. Row 1: K1, YO, K1, YO, SSK twice, K2tog twice, YO, K1, YO Repeat this across the row and end with a K1. If your stitches don't quite work out perfectly then skip a couple of the SSKs or K2togs to make it work. (i.e., just knit them instead of working a decrease). Row 2: Knit Now maintain this feather and fan pattern while also maintaining the increases alongside the triangle pieces at the front. You are going to have to keep your increases (YOs) balanced with decreases (SSKs or K2togs) while at the same time adding stitches at each end due to the triangular bits. I recommend that you just knit the stitches along the sides until you have enough to balance them. Keep this up until you have done the recommended number of rows before the next increase round that goes all across the shawl. Elizabeth will tell you to do another K1, YO row at this point but don't. This is what we are going to do instead. See the wobbly bit about a third of the way down the vertical lines of the feather and fan? That's where I fudged things sos that I could continue to work the Feather and Fan. My guess was that I would be fine if, instead of actually doubling the number of stitches, I just increased them a bit. Particularly since I only needed to do about four more inches to get to the elbow length that I needed before I added the lace edging. And I guessed correctly.
What I did
First I increased the YOs from 4 to 6 by just not doing the first SSK and the last K2tog and using those stitches to make the addition. I knit back and then on the next row I increased the YOs from 6 to 8 using the same fudging method. Knit back, and now on this next row you have to work things so the math once again makes sense. You need to balance your YOs (8) with 4 SSKs and 4 K3togs. You may not have quite enough stitches in the decrease columns to do this the first time through, but if you just work a combination of SSK, K2tog and simple knit stitches so that the math balances (8 YOs, with 7 knits between them, plus 4 SSK or knits on one half of the decrease column and 4 K2togs or knits on the second half of the decrease column) then it will work just as it should on the next pattern row. If this is too confusing and random for you there is an alternative. You can work a few more rows (up to 8) of the original 4YO Feather and Fan columns and use a wider lace edging to make up the length. Blocking will cover a multitude of small anomalies and blocking is essential for lace.
Scone Recipe --- Due to Popular Demand
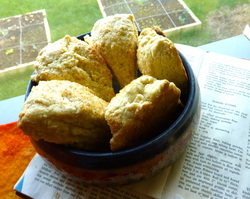
I could just re copy the scone recipe as it reads in the old cook book....but I really don't go by that one anymore. This is what I actually do.
Preheat the oven to 400 and grease the bottom of a pie pan or cookie sheet
2 cups of flour (use white, wheat, or a combination -- local is better -- I use King Arthur)
put in a handful of sugar (white, or brown)
a pinch of salt
a tablespoon of baking powder (I usually fill the little hollow in the middle of my hand when I cup it)
Rub in about a large hen's egg worth of shortening. I use Spectrum because it's not hydrogenated--the original recipe uses lard. By rub in I mean use your fingers to rub the shortening into the flour mixture until there are no large shortening lumps and the mixture holds together like wet sand when you grasp it in your fist. Add spices now if you like -- nutmeg is good but there's nothing wrong with cinnamon either. Now add raisens if you like, or dried cherries, or frozen blueberries.
In a two separate bowls break two eggs, letting the very watery part of the egg white run off into one bowl (you won't need much -- just a teaspoon or even less). In the second bowl throw the bulk of the eggs, a teaspoonful of vanilla and mix together with a fork. Get the milk out of the refrigerator and have it opened and on hand. Make a well in the dry ingredients and put the contents of the egg/vanilla bowl into the center. Pour in a little of the milk (about 1/3 of a cup or so) and using the fork stir the ingredients vigorously until the dough leave the side of the bowl. If there is too much dry stuff left on the bottom put in a little more milk. Move quickly. Once you have a loose dough pick it up in your hands and knead it together until it feels smooth. Place the ball of dough on a flat surface and flatten it with your hands until it is somewhere between 1/2 and 1 inch thick and fairly round. Now spill the watery egg whites on the top of the dough and spread it around with your palms. Sprinkle on a little sugar. Cut the circle into eight fairly equal pie shapes and arrange in the pie pan or on the cookie sheet without touching. Bake for 12-15 minutes, until the scones are golden brown and spring back a little when you press down on them. You can substitute yogurt for the milk. I have even made pumpkin scones by blending a big spoonful of canned pumpkin with the eggs/vanilla mixture. Lately I have made these with nutmeg and then served them with Greek yogurt mixed with a little honey and cut up strawberries. The best strawberry shortcake ever... I have also made them with blueberries, and then mixed the yogurt with maple syrup.
Or you could all just come to the studio and I'll make them for you.
I-Cord I-Pad Cozy and Reading Prop
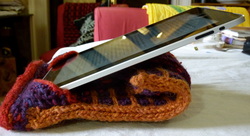
This pattern is available through Ravelry and can be downloaded as a PDF for $5.00. The yarn and buttons can be purchased from Peacefleece which is a wonderful company whose products are as high quality as their business plan. This I-Pad cozy is beautiful, protective and quite unbelievably pleasant to knit, use, and carry around. The slip stitch pattern makes color knitting simple and the resulting knitted fabric is thick and cushiony. The I-Cord bind off and edging is used throughout and, if you don't already know it, instructions are provided. It's a great technique to add to your tool kit.
Striped Handkerchief Scarf
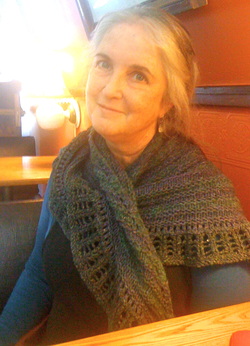
Here is the shawl photographed at Bintliff's here in Portland with my I-phone. You'll need three skeins of close but not quite matching worsted weight wool or alpaca, each approximately 100-150 yards or let's say 400-450 yards total. If you have some random skeins of alpaca laying about in the stash now is the time to dig them out. The softness and drapiness of alpaca would suit this project. Knit up with a larger size needle than you would usually use. This will enhance the drape of the finished piece and drape is really important for this kind of thing. You don't want a stiff handkerchief shawl. Handspun yarn would be beautiful for this project. Try to keep your colors close in range as that enhances the subtle color shifts. A high contrast color scheme will not have the same effect.
I used a Size 7 but I knit quite loosely. I got approximately 3 sts/inch after vigorous blocking.
This is an excellent project for 1) alpaca and/or silk yarn that is too floppy to make a good hat/sock/sweater or 2) small skeins of handspun where you just didn't want to spin up the necessary 1-2 pounds of roving to make a sweater or 3) you have the habit of buying just One Skein of Luscious Yarn and then don't know what to do with it.
 |
|
|
 |
Ann's Red Hat

And here is a picture of Devan wearing Ann's Red Hat. This hat was created for Ann and the saga of it's recreation appears on my blog, along with pictures of it on a variety of heads. This is a felted hat, and this version is knit up from a hand dyed alpaca/merino blend. I buy this stuff white and then dye it to get the colors I want. Felting it results in about a 20% shrinkage (from 5 sts/inch to 4 sts/inch) and gives you a wonderfully thick, soft felt with a slight halo from the alpaca. The embroidery on this is done with scraps of sock yarn, although I filled in some of the leaves and flowers with a little bit of needle felting for those of you who would like to give that a try. Ann's says that she needs to "touch up" the needle felting once in a while because it has a tendency to rub out of place around the edges. She doesn't mind this but it's something for you to think about.
This pattern is available through Ravelry as a PDF download and the cost is $2.50.
This pattern is available through Ravelry as a PDF download and the cost is $2.50.

Feather and Fan Scarf Pattern
Free Pattern for Feather and Fan Scarf - This is a simple lace
pattern that has 1 Thinking Row for every 3 Resting Rows and therefore
makes an excellent project for your first lace knitting endeavors. This pattern requires a multiple of 18 stitches so let me
walk you through the math. You need two repeats of the pattern so 18 +
18 gives you 36. Plus you need 2 stitches on each side which adds to 4.
So 36 + 4 = 40.
Cast on 40 stitches using the knitting on method of casting on which results in a fairly firm edge
Slip the first stitch as if you were going to knit it…then knit to the end of the row. Repeat this row 4 more times. I always slip the first stitch of every row when I am knitting unless there is a very good reason not to, which there usually is not, because it gives you a firmer and straighter edge.
Feather and Fan Scarf Pattern Repeat
Row 1 (Right Side) Slip 1, Knit to end of row
Row 2 (Wrong Side) Slip 1, Knit 1, Purl until you get to the last 2 stitches, Knit last 2 stitches
Row 3 (Right side) Slip 1, Knit 1, * (Knit 2 together) 3 times, (yo, Knit 1) 6 times, (Knit 2 together) 3 times * Repeat the portion between the **s once; Knit last 2 stitches.
Row 4 (Wrong Side) Slip 1, Knit to end of row
Repeat these 4 rows until the scarf is as long as you want it or you are almost out of yarn. I personally believe that a scarf cannot be too long, but preferences differ. End with Row 4.
Slip 1, Knit to the end of the row 5 more times and then bind off, trying to match the tension, more or less, with that at the beginning of the scarf. You will notice that both ends of the scarf are scalloped, but not in exactly the same way. In fact they will fit into each other like jigsaw puzzle pieces, a fact that I have used to amuse myself in idle moments when I did not have any knitting handy. A 4 oz. Skein will make a scarf, and 8 oz skein would make a lovely shawl, just add 18 more stitches when you cast on (total of 58) and do one more repeat of the pattern.
Generally speaking the principles of yarn choice when you are knitting lace is that light color, smooth texture, shine, and large needles in proportion to the yarn all enhance the appearance of lace. I call these principles rather than rules because you can bend or break a few of them and the lace will still work. This particular yarn is a beautiful soft white, fairly smooth (and really soft), not shiny at all, and is a worsted weight. I used a lovely set of size 7 birch wood needles that have hand painted Russian wooden beads on the ends. This is not a very big size for this thickness of yarn, but I am a very loose knitter. Use whatever size needle you need to get a nice feel to your work. Using the wool/alpaca blend and size 7 needles I got a scarf 8 inches wide, so a gauge of 5 stitches to the inch. If you happen to be a tight knitter use a larger needle size. But do try to learn to knit loosely. It will make your entire life more relaxing.
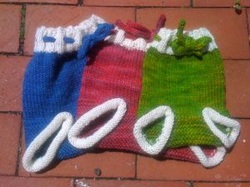
Soakers for Babies
Have you ever
heard of a soaker? Your grandmother will probably know, and your
great-grandmother definitely would. Soakers are an old technology used
before plastic pants for diapering children. Wool holds up to 1/3 of
its weight in liquid before it begins to feel damp, which makes it the
most useful fiber for a soaker. The wool is also mildly antibacterial
and breathes which helps eliminate diaper rash, and makes a soaker more
comfortable in hot weather. This is how it works.
In the morning diaper your baby with a cloth diaper and put the
soaker on over it. When your baby's bum begins to feel the slightest
bit damp it's time for a change. Change the cloth diaper and put the
same soaker back on. Repeat often throughout the day. For night time
use the same soaker but double or triple diaper your baby with cloth
diapers. In the morning change the baby and put on a new soaker. Rinse
the old soaker thoroughly in warm water, using soap only if the soaker
has become soiled (think poop). Squeeze out most of the water and lay
the soaker out flat somewhere to dry. You should only have to rinse out
or wash one soaker a day. Five or six soakers should be an ample
supply. Over time you will notice that the soaker will felt in the
crotch area which will only improve its effectiveness.
Free Soaker Pattern
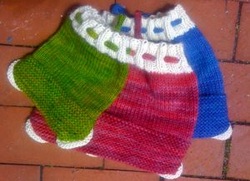
You will need 2-4 ounces of worsted weight yarn to create your soaker, plus about 1 ounce of the plain undyed for the trim. I used size 5 needles but I knit very loosely (it’s more relaxing that way). Use what you need to get a gauge of 5 stitches/inch. I recommend a circular needle 16 inches long and a set of double points in the same size to make the I-cord and leg trims. You can buy the hand-dyed wool/alpaca on my etsy site. Go to www.marthamarques.etsy.com
Sizes are newborn, small (0-6), medium (6-12), large (12-24) and toddler.
Cast on 56 (72, 80, 88, 96) and join for knitting in the round. Knit 5 rows of K2 P2 rib. On the next row K2, yo, P2tog. Resume K2 P2 rib for another 4 rounds and change color.
Knit only until colored portion below the ribbing measures 3 1/2 - 4 1/2 inches long....longer for the larger sizes. Place 12 (16, 17, 19, 21) stitches on a holder. Now knit back and forth (no longer going circularly). Knit 2 tog at the beginning, and only the beginning, of every row until you have 12 (16, 17, 19, 21) stitches left on the needle. Fold up these raw stitches to meet the ones on the holder and Kitchener Stitch them together. Pick up stitches around the leg openings being sure to pick up 1 stitch in each row (for stretchiness). Space more or less evenly on your double points and knit for 6-8 rows. Bind off loosely. The edge will roll up nicely on its own. Knit an I-cord in the colored yarn for the tie, which should be at least 3 times as long as the soaker is wide.
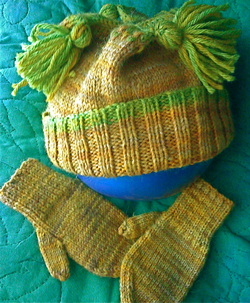
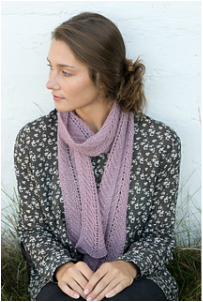
Season's Greetings Gloves and Mitts
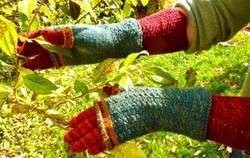
This pattern includes both the long Greta Garbo like gloves and the short fingerless mitts. I wear them both together (for extreme warmth and stylishness) and separately. I recommend sock yarn for these because of the combination of warmth from the wool, resistance to wear because of the nylon and washability. A 3.5-4 oz skein of sock yarn is enough for the gloves with enough left over to incorporate into the Fair Isle trim on the mitts. The mitts use 1.75-2 oz of sock yarn and you'll have a bit of that left over as well. The remaining trim colors can be pulled from your stash. The Mitts use a small amount of two color knitting and cables. The gloves have a lace pattern on the arms and go to simple stockinette on the hands.
And a picture of just the mitts
If you have never done Fair Isle before these mitts give you a little bit of it to get your mojo going. The cables are a mock cable that you can do with or without a cable needle. Also if you have never made gloves or mittens before this is a good pattern for walking yourself through the whole Thumb Gusset Issue. The pattern is sold as a downloadable PDF on Ravelry and is 10 pages long so you can count on lots of pictures and lots of going on and on about the details. The cost is $6.00.
French School Girl Cardigan
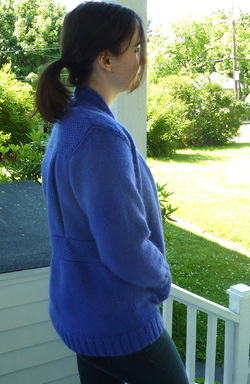
The French School Girl Cardigan is my go to sweater for everyday wear. It has pockets, a shawl collar and a belted waist in the back with pleats. It has a somewhat frumpy old English cardigan look from the front, but the belted back is quite flirtatious -- hence the name. This is a simple knit made mostly with stockinette stitch with some seed stitch, a ribbed collar and front band, and I-cord bind offs. It's really all in the dressmaking details for this one....if you detest sewing up you should either pass or find a friend who loves it. You could knit two, she could sew up two and you could both be happy. This is my second version of this because I wore the first version completely out in 2 years (really -- that's how much I loved it). I knit it up with Peacefleece which is a merino/mohair worsted yarn. It took 6 skeins or 1200 yards at a gauge of 4.5 st/inch on size 5 needles. Make up the sleeves first as I recommend in the pattern to test your gauge, after you have made up your swatch of course. I like this sweater in a nice sturdy wool or wool blend, which blocks better than other fibers. this sweater will require blocking in order to have this tailored jacket look. This is a long chatty pattern with a lot of pictures and explanation on how to adjust for your size and proportions. You can make it to fit and flatter your own particular assets by adjusting the height of the waistband, the width of the shoulders, the length, etc. I give suggestions on how to accomplish all this as well The French School Girl Cardigan is available through Ravelry as a PDF download and the cost is $5.00
Hooded Jacket for Everybody
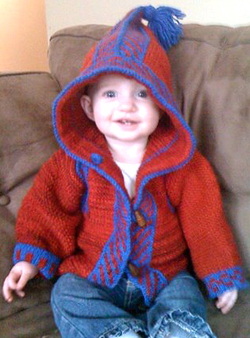
This is easily my most popular pattern so far. I have made it for babies, toddlers, children, women and even for my 6'4" son. This version was knit up by one of the Studio Knitters. It is a mostly garter stitch pattern with some simple two color knitting. I designed this sweater after I had seen Elizabeth Zimmerman's TomTen jacket. I wanted to make it a little more fancy, hence the Fair Isle bands, with a bigger hood, and also adjustable to fit for a couple of years even for a growing baby. Please note the wrist bands in the picture. They are not knit in two different patterns, they are knit with a pattern on both sides. One is rolled up (for a small baby) and one is not. I recommend that you make it a bit long, maybe mid-thigh, in order to get 2-3 years out of it. Children get taller more quickly then they get bigger around so the sweater will get shorter but still fit. I made one for my niece Blythe when she was 4 and I recently saw it on her now that she is a grown girl of 8. The sleeves are three quarters now, and the sweater's bottom edge sits almost exactly at her waist but it still looks great and she still loves it very much. You can go on Ravelry to check to see this knit up in a variety of yarns, sizes, and color combinations which is one of the major great good things about Ravelry. It is available to buy as a PDF download where I tell you how to adjust for size, yarn, gauge etc. using simple grade school level mathematics. The price is $4.00
Shopping Shawl

The Shopping Shawl was created so that I could go grocery shopping without having to hold my shopping list in my teeth while I shoved produce into little elusive plastic bags -- so undignified don't you think? It is made using the Fishbone knitting stitch and is therefore completely reversible except for the pockets which are on only one side. I knit this with Peacefleece which is a mohair/merino worsted weight yarn at a gauge of 4 stitches/inch on a size 7 needle. I recommend that you work up the pockets first which will familiarize you with the pattern, double check for gauge, and give you an opportunity to see if you like the drape and feel of your stitch/needle/yarn combination. For a shawl gauge is not as important as the drape and feel of your knitted fabric. I used 7 skeins of Peacefleece or 1400 yards but I used all but 9 yards of my yarn. This is a garment that is based pretty much on height -- shorter knitters will require less, taller knitters more in order to get the knee length you see here. This model, my daughter Devan, is 5'9" and is very cooperative to be modeling a wool shawl in 90 degree weather. Please note the flipflop feet. Again, I recommend not using a pure alpaca yarn for this shawl -- although a wool alpaca blend would be beautiful. Again, hand dyes are great for this because the garter stitch rows display the shifting colors while controlling the flashing and pooling that hand dyes sometimes have. I have also thought that a nice hand spun yarn would be gorgeous. This is my go to shawl for long walks, reading curled up on the couch, and going to the Farmer's Market. I am now offering Shopping Shawl Yarn Packages on my Etsy Shop, which is basically enough yarn to make the Shopping Shawl in a color and material that I know from experience will work well with this pattern. The Shopping Shawl requires a worsted weight yarn that is bouncy (not pure Alpaca) and drapey (not pure wool). Go to the Etsy site to see what I particularly recommend.
This is available through Ravelry as a PDF download and the cost is $4.00
This is available through Ravelry as a PDF download and the cost is $4.00
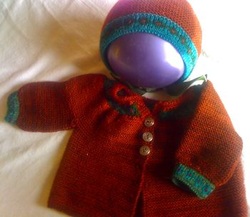
Mostly Garter Stitch Baby Sweater and Bonnet
This is another mostly garter stitch project, with just enough two color knitting to amuse you without making you crazy. It is, therefore, an excellent project for people who want to dip their toes in Fair Isle Knitting without making a big commitment. I like sock yarn for baby things because it is washable, you can get colors that aren't strictly speaking baby colors, and there is enough wool in it to make it really warm. Synthetics in a Maine winter are no friend to babies or anybody else. This particular sweater was knit up for my niece Shannon's baby Josephine. It has lots of restful garter stitch and a hand dyed yarn is great for those kind of projects since the garter stitch really shows off the beauty of the shifting hand dyed colors. You need enough to make a pair of socks (3.5 oz, 100 grams) with some bits from your sock yarn stash to make the trim. Gauge is 7 st/inch on size 2-3 needle. The price is $4.00 and the pattern is available as a PDF download from Ravelry.
Shape Shifter Coat and Jacket
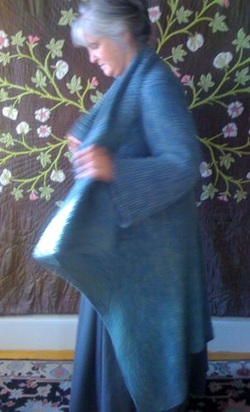
This is a garter stitch coat which, when worn upside down, becomes a jacket with a lovely larger collar perfect for wrapping around your face and neck. It is a long, lovely relaxing knit at 3.5 stitches/inch on a size 10 needle (for me -- you may differ) and requires 1600-2100 yards of bulky weight yarn. I know that that is a number with a great deal of wiggle room, but this design is adjustable to your measurements, and height is the most important measurement. I am 5'6" and I needed 1800 yards. If you are 5'0" you may be able to get away with less than 1600 and if you are 6' you are definitely going to need the full 2100 yards. I explain how to make the adjustment in the pattern which, like all my patterns, is chatty and has in addition a bit of simple grade school mathematics in order to work things out for your specific project. I used a pure alpaca yarn (Misti Alpaca) for this coat, but that was a mistake. The alpaca tends to stretch and the weight of the yarn makes this coat get longer with wear. You should get a blend with at least 50% wool, which has more elasticity than alpaca. The 50/50 wool/alpaca blend from KnitPicks would be perfect and is what I have recommended to my Studio Knitters who are working on this. This is an amazingly useful travel garment which works as a coat, a jacket, a shawl, a bathrobe, and a nice warm afghan if you are the type that can sleep on a plane. It is available as a PDF download from Ravelry and the cost is $4.00
Martha's Scarf
I have a pet peeve with scarfs or shawls that have a right and a wrong side. While I was pondering my irritation with this, I designed this stitch pattern, which is exactly the same on both sides, and also has the benefit of laying perfectly flat. It makes a perfect scarf. I am a loose knitter and I like it that way....it's more relaxing. To make the scarf twice as long, use twice as much yardage. Even though this is a lace pattern the finished impression is more herringbone than openwork and it would work quite well as either a man's or a woman's scarf. This pattern is $5.00 and is available as a downloadable PDF through Ravelry.
