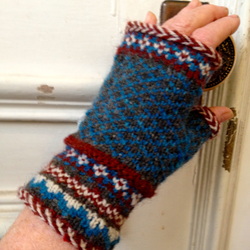
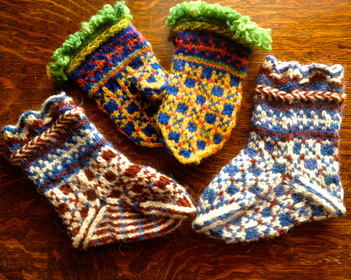
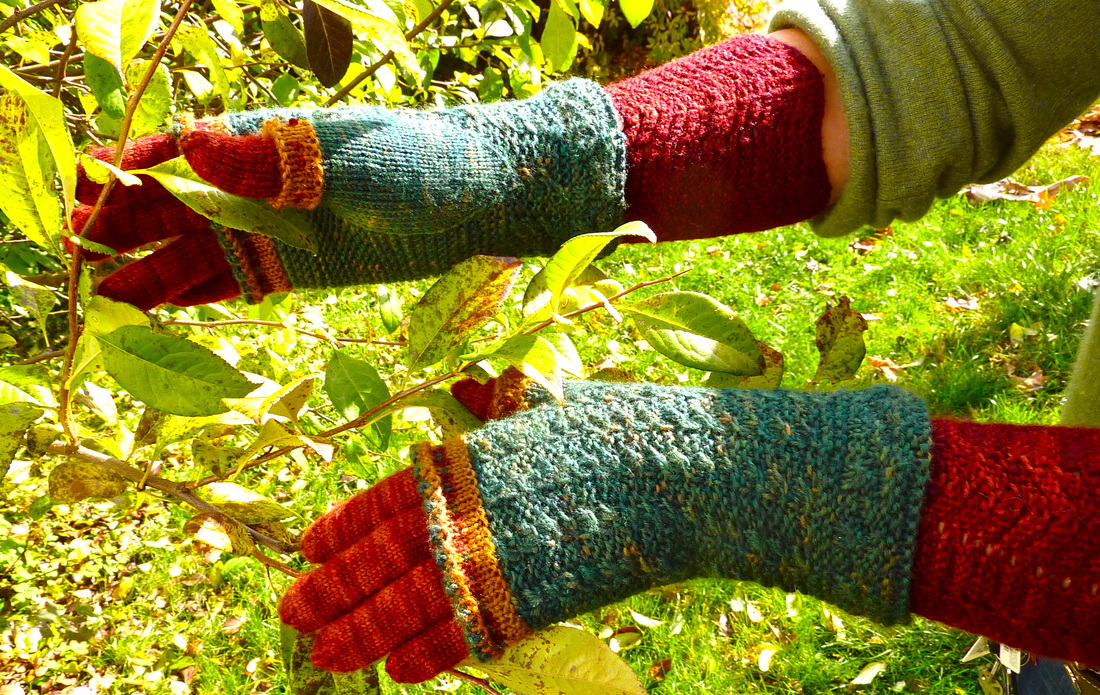
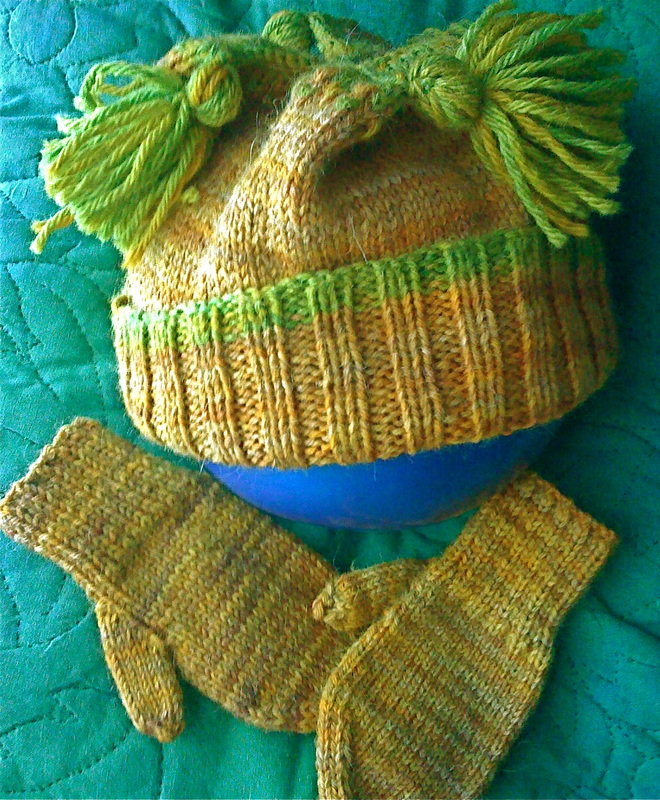
These mitts are knit from my annual Post Christmas/My Birthday is Coming gift box to myself from Peace Fleece. I ordered an assortment of their DK weight yarns and then they sat calling my name until I put everything else aside and made these mitts. Fortunately mitts are quick to knit so I was only distracted from my "normal" life for a couple of days. There is a pattern for these posted on Ravelry and I will also be adding the links to my Patterns page. These mitts only weigh about 1 oz apiece so you may very well be able to make them out of the bibs and bobs from your yarn stash. But do give the Peace Fleece DK a thought. The texture of these are lovely, warm, hefty and, once you wash, block and wear them a bit, delightfully fuzzy.
3 Comments
My Wedding Socks, which I created for my nephew Scott and his wife Elizabeth, were recently featured in Interweave's Knitting Daily. Here is the link With These Socks with a bit of my own write up about the how and why of my Wedding Sock Tradition. If you want to make your own Wedding Socks for a lucky set of newlyweds you can find the pattern, logically enough, on the Pattern Page or you can find it on Ravelry. These are photos of the Shape Shifter in the original version. I love this design. It works just the way I imagined it would and is the perfect traveling garment. In one direction it's a coat. If you turn it upside down it's a jacket with a hood. It's a blanket on the plane or a bathrobe in the hotel. It's a cozy curl up on the bed and read garment, or a glamorous wear it with a dress and boots kind of thing. The simple garter stitch is flexible and the texture really highlights the color shifts of a hand dyed yarn. You can find this pattern on my Pattern page or on Ravelry or on the ThreadsofMeaning site on Etsy. There is one problem, however, with the prototype version of the Shape Shifter. The original version is knit from a hand dyed pure alpaca. Alpaca is a very soft and drapey fiber and, as a consequence, the original Shape Shifter has a regrettable tendency to grow in length as you are wearing it. I have long wanted to try it again with a pure wool, which would have more bounce and elasticity and would mitigate the getting longer as you wear it problem. So I ordered this bulky pure wool from Webs this past week and, as usual, the service from Webs was excellent and the price was very good. The problem??? Not loving the color. So all 20 balls got skeined up on the Niddy Noddy and put to pre-soak in Citric Acid and water. They are going into the dye pots today. I'm thinking I'll over dye with a Kelly Green and maybe some Turquoise which should give me a lovely Teal color. I'll keep you updated as I progress. And here is the update. This is the result of over dyeing the grey blue in the picture above with Kelly Green and Turquoise. There is still some of the grey blue peeking through, the shifting greens and brighter blues are there, and a serendipitous lavender/lilac color has also managed to show up. I do want to point out that this is not exactly the results that I was anticipating. I thought I would get a duller teal color and I could get closer to what I intended by over dyeing with some Forest Green and/or a thin wash of black. But I am going to let this hang around the studio for a while and see if I like it better than what I had in mind in the first place. This is one of the prerequisites of happy hand dyeing .... an open mind that likes to be pleasantly surprised. Actually that may be one of the prerequisites of a happy life now that I think of it. Day April 20 (which is a Saturday) Time 9:00-4:00 with Soup Day Lunch Cost $45.00 with materials included Facts of the Class: You will get a pattern for Latvian Mittens, Latvian Socks, a fringe cast on and a ripple cast on, the Latvian Braid, plus directions for scaling up the pattern for adult women's size. This directions will be written and there will be graphs. You can always contact me for help at the time of the class or anytime in the future. I fully support my patterns no matter what, forever or at least until my inevitable demise. I will provide yarn for the class to make it easier to give directions. For example I am thinking of using black/white and red from my stash. That way when I give directions for the decrease at the top of the mitten I can say Black Yarn, White Yarn which helps with the confusing semantics, (background color??? main color??? secondary color???). The class will never be more than 8 people. If it gets to 9 or more I will split the class and offer it on the next Saturday (April 27) as well. It's just too difficult to be helpful to more than 8 people at a time. You can pay me the day of the class (if the class isn't overbooked) or in advance (to hold your place). I take checks, credit cards, cash money, and have even been known to do swaps. Talk to me if you have questions -- we can work it out. Class will be held at the Threads of Meaning Studio -- most of you have been here but I will provide directions. If you have never been to the studio or taken a studio class from Threads of Meaning please convo me and I'll give you the particulars in an e-mail. Here is a Photo of my Great-Niece Phoebe enjoying her mittens. It was her idea to offer the socks and she presented her idea to me by putting the mittens on her feet and giving me a delighted look of discovery. I have just finished up with my latest batch dyeing of the sock yarns. All of my colors are OAK (One of A Kind) because I have a tendency to overdye colors that I think need improvement rather than starting with a white base yarn like most hand dyers do. It's a kind of upcycling for me. Consequently the colors tend to be created according to whim rather than carefully measured and reproducible formulae. These gloves and mitts that you see below are knit up from some of the hand dyes and the pattern is available for purchase here. The yarns are for sale as well and you can find them on my Etsy site. I also like to use the hand dyed sock yarns for baby things. The superwash merino is very soft and it's also washable which is a nice thing for the baby's mother. I also like to knit baby things in not so baby colors. The prototype for this little sweater and bonnet were made for the baby of my niece and she was pretty opposed to pink. She was delighted with this color combination and the baby was beautiful in it. I don't have a photograph of the baby, though, so you have to be satisfied to imagine the baby's head in place of the purple ball. The pattern for this sweater, which is quite a relaxing knit being mostly garter stitch, is available here. Yesterday, while I was watching the snow fall all day long through the studio window while I was sitting warm and snug inside I caught sight of this beautiful red hand dyed alpaca/wool blend. I only had one small ball left. What to do? What to do? Then I remembered that I had one small grand nephew, my friend and relative Waits, who was in need of mittens. Kismet -- it was meant to be. These are knit using my DNA mitten pattern, which is what I use when I just want to make mittens without too much heavy thinking. You can see the pattern in the post below. I subscribe to Piecework online and it comes to my I-Pad every other month. This month there was an article on Harriet Prescott Spofford and Women's Work in Nineteenth-Century New England. There is a secondary article on 1861 Cottage-Industry Mittens and Wristers which talks about the cottage industry of mitten knitting that women used to augment the family income at that time -- particularly in New England and even more particularly in Maine where the need for "the most common style of mittens, made from homespun or store-distributed yarn and sold to village stores to supply farmers, lumbermen, and fishermen" (p. 50, Piecework Jan-Feb-13) was almost universal. In Maine during the mid 1800's the vast majority of men were either farmers, lumbermen and/or fishermen. I read through the pattern provided for these basic mittens and was overwhelmed by a strong feeling of deja vu. The construction techniques, from the K2P1 ribbing, to the purl stitches at the edge of the thumb gusset (see it on the yellow mittens above) to the closure on the thumb and at the top of the mitten were exactly as I had been taught to make them when I was five years old and made my first pair for some lucky part of our big Maine family. These mittens, which I can easily make for a child or a woman in a day without even making a dent in my ability to pay attention to something else were showing up in this national publication. It was like seeing a picture of your great-great-grandmother on the cover of Time Magazine. I immediately called my mother, who taught me to make mittens, to follow up. "Who taught you to make mittens?" I inquired. "Why my mother I expect," she said. "And who taught her?" I wanted to know. "Well, her mother. Or her Grandmother Adeline -- you know Grammy Staples." Adeline lived in Calais Maine in the mid 1800's and had a large farm family of 9 children. She knit constantly and I have, through Nana who is my great-grandmother, the double pointed knitting needles that she used. They are steel with different kinds of points ground onto the ends, and of various lengths from 9 inches (for mittens, hats and socks) to 22" (for circularly constructed sweaters like Ganseys). I have used the 9 inch ones many times and they are my go to needles for what I call VooDoo socks which I generally make for wedding presents -- one pair for the bride and one for the groom -- because of my feeling that it knits the new member into the family. I have been really moved emotionally by reminder of how old some of my knowledge is, how far back it goes, and the lifestyles that created it. I am going to my big bowl of handspun yarn right now to dig through and look for appropriate yarns to knit up a pair of mittens and wristers for my son. And I will be using Adeline's needles. DNA Mitten Pattern I have been knitting since the age of 4. We had a big family with many children in Maine, so one of the very first things I learned to knit was mittens. I am going to try to analyze and clearly describe a process that is encoded on my DNA, hence the title. This is a basic, solid color mitten with no tricky pattern stitches or other flummery. You can add that to your future efforts once you have made a pair or 10 of the basic sort. These make excellent Christmas gifts for children. I often make them in sets of 3 so that a lost mitten is no catastrophe. If you have never made mittens before I recommend that you make the first pair for yourself. This is mostly because you have your hands right there in front of you, knitting , and that makes them handy for trying on and test fitting. Once you are familiar with the process you should be able to grade the whole business up or down to fit hands that may or may not be right in front of you. For the purposes of general descriptions these are the approximate measurements for mittens above the line of the cuff for the various sizes of human beings. Child Small - 5 inches around and 5 inches long Medium - 6 inches around and 6 inches long Large - 7 inches around and 7 inches long Adult Small - 7 inches around and 7 inches long Medium - 8 inches around and 8 inches long Large - 9 inches around and 9 inches long Now your human beings may come in non-standard sizes with long narrow hands, or wide baseball mitt shaped hands so accommodate to your people, don’t blindly follow the measurements. One of the advantages of hand made as opposed to mass produced mittens is that you can make your mittens one at a time to actually fit the person, who has also, usually, been made one at a time. First question.....what kind of yarn are you using? If it is worsted weight then you will get approximately 5 stitches per inch. If it is DK or sport weight then you are probably looking at 6 or 7 stitches per inch. If it is fingering or sock weight yarn then we are talking about 8 or 9 stitches per inch. The weight of the yarn has more to do with the gauge then we usually think, and the needle size has less. Mittens are best when knit at a fairly close tension so use a smaller size needle then you usually would. Here is another general list. Worsted Weight - needle size 4-7 DK or Sport - needle size 3-4 Fingering or Sock Weight - needle size 0-3 I’m going to assume that you are knitting your mittens on double points since that is the way it is traditionally done. It can be done on two circular needles, or one long circular needle either singly (one mitten at a time) or for the adventurous doubly (two mittens at a time). I am going to assume that with your first pair you are not going there, although it does give you something to aspire to. Work up your gauge. Cast on 20 stitches and knit on the front, purl on the back side for about an inch or so. Now measure how many stitches you are getting to the inch. This is your key number which we will abbreviate as N. If you are using worsted weight N=5 in all probability. Take your number N (I am going to assume it was 5) and multiply that by the number of inches around your hand (I am going to assume 8 for Adult Medium). Multiply N by your measurement to get the approximate number to cast on. (5x8=40) Making the Cuff Fudging takes place here. I like to use a Knit 2 Purl 1 rib on my mittens for the cuff. This rib is stretchier and allows for a little elegance of construction when we do the thumb gusset later so just go with me here. 40 is not divisible by 3, but 39 is. I would cast on 39 stitches and Knit 2 Purl 1 for one row. Do not join first as you usually do. This creates a little ridge for your first row that makes it easier to join without twisting because you can see what you’re doing. Now place 13 on each needle and join. I like to start every needle with a knit stitch because it makes the knitting of the cuff more automatic pilot for me and requires less paying attention, so do that too. So now we have 39 stitches in all, split into 13 stitches on each of 3 needles, each one beginning with a Knit 2. Do Knit 2 Purl 1 ribbing until the cuff is as long as you want it to be. For children 2-3 inches is usually good, adults may want it a bit longer, say 3-4 inches. Setting up for the Hand and Thumb Gusset We are now going to divide our number of stitches roughly in half. We will reserve 20 stitches for the front of the hand, so place 20 stitches on one needle. Split the other 19 roughly in half, placing 9 on the first “short” needle and 10 on the other, but pay attention to where your Purl and Knit Stitches are. We want to have a Purl 1, Knit 2, Purl 1 section at the beginning of the 9 stitch needle. We are going to use that section to make the thumb gusset and if you do it my way you will have an elegant line of purl stitches that goes all the way from the base of the cuff up each edge of the thumb gusset. It is a small thing that in no way affects the utility of the mitten, but it amuses me so I am telling you about it. From now on all stitches will be knit with the exception of the Purl stitches on either side of the thumb gusset. Beginning with the 9 stitch needle and a purl stitch, Purl 1 Knit 2 Purl 1 and then knit until the first round is completed. You may want to increase up to 4 stitches in this first plain knit row, depending on the shape of your hand. A long narrow hand won’t require any increasing. A broader hand with a narrow wrist would benefit from a few extra stitches above the cuff. Continue knitting around and maintaining the Purl 1 Knit 2 Purl 1 base for the thumb gusset for 2-4 rows. Now we are going to start increasing for the thumb. Thumb Gusset Maintain the purl stitches going all the way up the edges of the gusset. Row 1 and all odd number rows): Purl 1 Make One by knitting into the stitch below, and then into the stitch on the needle. (Right handed make one) Knit whatever is in the middle here which on row 1 will be 0, on row 3 will be 2, on row 5 will be 4, etc., etc. Make another one by Knitting the stitch on the needle and then into the stitch below (Left handed make one). Purl one. Knit plain for the rest of the row. Row 2 and all even number rows. Knit all knit stitches and purl the two stitches on the outside edges of the gusset. Do not increase on even number rows. Keep this up until you have increased 10 stitches and there are 12 knit stitches in all between the purl stitches on the outside of the gusset. Run a length of contrasting yarn through these stitches to hold them and cast on 4 stitches to close the gap. Now just knit around until your mitten is an inch or so shy of your final measurement, in this case 7 inches above the line of the cuff. Setting up to decrease for the top of the mitten. Check your thumb position. Look at your the hands palm up. When you are looking at the palms of your hands, or your mittens, the thumb is on the right on the right hand, and on the left on the left hand. Place your stitches so that you have half your stitches on one needle for the front of the mitten and the thumb gusset is on the right side for the right mitten or on the left side for the left mitten. This may require some initial fussing around with your double pointed needles to get things placed properly. Just move your stitches around until you it is correct and then place your 4th double pointed needle wherever it needs to be in order to begin to knit again. Knit 1 round ending up on one side or the other of the front of the mitten. You should have 1/2 of your stitches on one needle, and 1/4 of your stitches on the other two. Round 1 Side 1 - Knit 1 stitch, PSSO (this is done Slip 1, knit 1, pass the slipped stitch over the knit stitch -- henceforth referred to as PSSO), Knit until you are within 3 stitches of the end of this side. Knit 2 together, Knit 1 Round 1 Side 2 - Do the same thing. Round 2 and all even rounds - Knit all stitches Round 3 and all odd rounds - Same as round 1 You will notice that on the odd number rows you are decreasing a total of 4 stitches each time. When you reach the point when you have 6-8 stitches left on each side you are ready to close the top of the mitten. You can Kitchener stitch it together which is what I do because it is tricky and looks good. You can do a 3 Needle Bind Off. You can just cast off and sew the top of the mitten together. If you decide to Kitchener stitch the tops together then just put the first mitten’s top stitches on a length of contrasting yarn and complete the other mitten so you can finish them both at once. It is easier to remember how to Kitchener stitch when you are doing both at once rather than one, and after a long time passes, another one. Finishing the thumb Pick up the 12 stitches on your thumb, and then pick up 4 more where you “cast on 4 stitches to close the gap”. Spread them out with 5 stitches on each of 3 needles, knitting two together where necessary to close up the little hole that is always cropping up at the base of the thumb join. Knit around and around until the thumb is long enough, approximately 2 inches for adult medium, but thumbs differ so feel free to try the mitten on to check. Closing off the top of the thumb. PSSO at the beginning of each needle and K2tog at the end of every needle. You should have 3 stitches on each needle now. Slip 1, K2tog, Pass the slip stitch over on each needle. You now have 3 stitches left, 1 on each needle. Break off the yarn and, using a darning needle, thread through the middle of each stitch and pull gently to close up the hole. Work your end in and cut the tail of yarn off so it doesn’t hang there foolishly. My baby brother Mike has his birthday uncomfortably close to Christmas. It is a tradition that I make him a yearly pair of Christmas/Birthday socks. This tradition started when he was, in fact, a baby with cute little feet that resulted in cute little socks that knit up quickly. And since I'm only 3 years older than him that made everybody happy...a child size project knit up by a child for a little boy's cute little feet. Well.....50 years later and things have changed a bit. Not the tradition of the knitting of the Christmas/Birthday socks but the size of the feet. You see the baby brother got bigger. Much, much bigger. This is a closeup of my brother Mike's size 13 feet. This means that the foot of these socks is almost exactly 13 inches from heel to toe which is a powerful lot of knitting. Which is why I had to keep myself entertained with these interesting striped heels and toes and that very satisfactory slip stitch diamond pattern. There is a pattern for Mike's Enormous Socks on Ravelry if you would like to give it a shot for the Object of Your Knitting Affection. I added in tricky bits because Mike's feet are huge and I can't tolerate the endless repetition without something to amuse myself. These socks can be made with simpler toes and heels (I give you directions). But I would keep that Slip Stitch Diamond band. It's really much easier than it looks. In the meantime here is a picture of my actual brother Mike. He had to get into some pretty contorted positions in order for me to get photographs of his Christmas/Birthday socks. He had no idea that the working conditions of a sock model were so rigorous. As you can see from the photograph he is still the cutest thing in the world, and well worth the effort of the socks. However, given the rigorous modeling challenges and the fact that he was actually wearing his socks he just walked off in them, a bit early for his Birthday and Christmas. But whose going to argue with that face? I just finished this latest incarnation of the Hooded Jacket for Everybody. If you are interested in making one for the Object of Your Knitting Affection you can find the pattern on Ravelry. This is a pattern that is scaleable from size Phoebe (6-18 months) up to size Full Grown Man (my son Blake who is 6'4" and has one done up in Black/Blue/White). Phoebe came by today to visit and we coaxed her into modeling this for us by requesting her assistance with some vital tasks in the garden. Most young ladies of character will not just slap on a jacket willy nilly and wear it to have their photos taken. They need a task and a purpose. And they also need the occasional hug from their mother which, as you can see, is being helpfully provided here. Here you can see Phoebe noodling around in the herb bed looking for carrots (?) or maybe strawberries (?). She's definitely looking for something. Maybe worms? She helpfully dug up some seeds, picked some sage, and threw leaves out of the garden onto the leaf covered lawn. And, in the picture below, you can see that she has finally gotten some work out of the way and has begun to think about her new sweater. She has discovered the buttons, and approves of them. Shortly after this she discovered the twisted cords and decided that those, too, met with her approval. November is when I begin to focus rather obsessively on doll and bear and ball making. Somehow once the leaves fall I start thinking about toys. These Penny People represent my latest results. Why Penny?? Well, there's a penny sewn into the bottom under the red felt base to provide flatness and weight so that they stand up better. And these dolls are made almost entirely from leftover scraps from making the bigger dolls. Plus they're little -- about 4 inches tall. So they are penny pinching, penny sized, and have an actual penny in the feet. They are for sale on my Etsy site if you would like to get one or two of your own. |
About Martha
Archives
February 2019
Categories |