Threads of Meaning LLC
  • Martha's Blog
  • About Martha
  • Patterns
  • The Quilts
  • My DVD
  • How To Videos
  • Contact Us

Two Quilts From Their Father's Shirts

11/18/2012

2 Comments

 
Picture
Picture
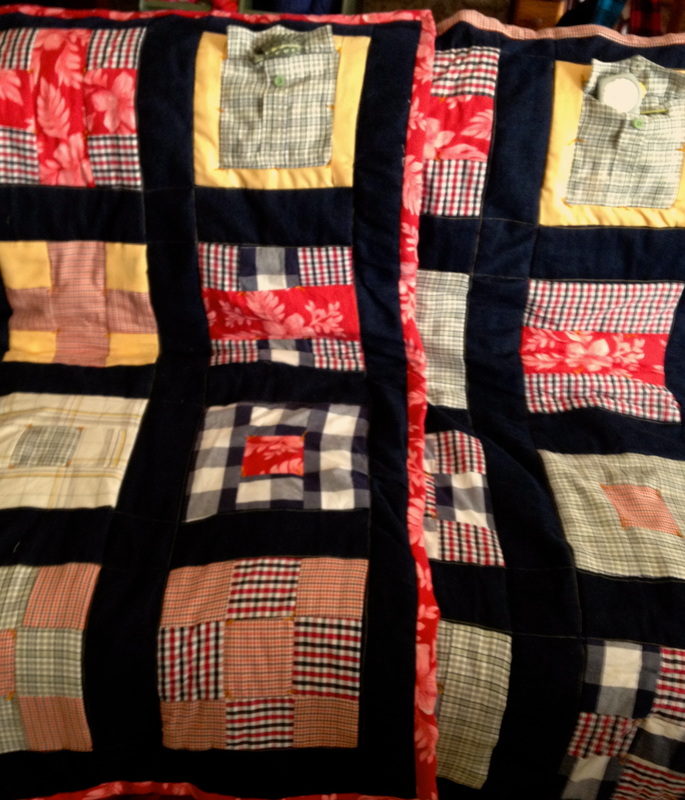
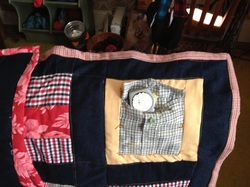
Let me start off by saying that this is a poignant story.  This sort of work, machine pieced patchwork with machine quilting, is not the kind of project that I would typically do.  But the story behind the project, and the experience of working on the project, and the two boys who were the final recipients of the project, all made it so worthwhile and well within the parameters of Threads of Meaning.  I got a phone call from their aunt last July asking if I would be able to use some her brother's clothes to make two quilts for her nephews.  Her brother had unexpectedly died while he was in an isolated cabin in Alaska and she wanted the boys to have something to remember him by.  I had her bring the boxes by so we could sort through them and see what we would have to work with.  I wanted to involve her in every step of the project that I could because I could tell that she was grieving and I thought it would help.

Picture
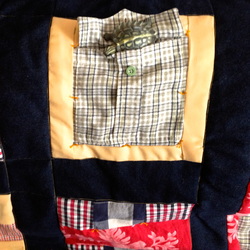
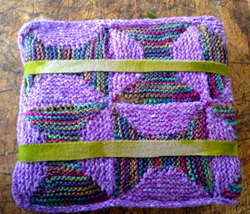
Starting in September she began to come by in the afternoon and help me with the work.  She is not a seamstress herself, but she did the cutting, the ironing, and was involved in choosing the fabric combinations and planning the quilt.  One of the things we incorporated was this idea of a Pocket Patch.  I made the quilts so that they can hang on the wall or lie across the bed and we thought it would be good to have a pocket on each one to put keepsakes in (jack knives or tape measures) or even Christmas and Birthday gifts.  I should also say that his clothes, when they came out of the boxes, when we ironed and sewed them, still smelled like him.  This caused some tears, but also made the whole feeling of the project so real.  And his sister found, as she worked on this project, that it did make her feel better.  It seemed to her as if she were still in touch with him and using his things to pass something meaningful along to his boys. 

2 Comments

Introducing the Penny People

11/12/2012

0 Comments

 
Picture
Picture
November is when I begin to focus rather obsessively on doll and bear and ball making.  Somehow once the leaves fall I start thinking about toys.  These Penny People represent my latest results.  Why Penny??  Well, there's a penny sewn into the bottom under the red felt base to provide flatness and weight so that they stand up better.  And these dolls are made almost entirely from leftover scraps from making the bigger dolls.  Plus they're little -- about 4 inches tall.  So they are penny pinching, penny sized, and have an actual penny in the feet.  They are for sale on my Etsy site if you would like to get one or two of your own. 

0 Comments

Amusing Christmas Balls

11/2/2012

0 Comments

 
Picture
I generally make a bowl full of these balls leading up to Christmas.  They sit around looking decorative and then disappear into the toes of Christmas stockings.  Because they are great for using up scrap yarn and I stuff them with fabric scraps from making things in the studio the whole making of the Amusing Christmas Balls project is extremely appealing to my obsessive frugality.  They are appealing to Joe for different reasons.  How do I say this?  Boys love these balls.  They can juggle them, toss them and even loft them at their wife's head during idle moments.  I have to stash the bowl of balls in the Studio because otherwise Joe will take liberties, and although it is not dangerous, what with the fabric stuffing, it does interfere with my concentration when I'm knitting.  There is a Pattern for them in the Pattern section if you would like to make your own.

0 Comments

The Other Studio Room or Where I Keep the Big Honking Loom

10/31/2012

0 Comments

 
Picture
This is what I usually refer to as The Studio.  This is the room where I teach classes, sew, have my table for cutting out, serving scones, stretching lace, and all the other things that a table is so useful for.  As I result my table is cleared off daily and immediately reclutters itself with whatever I happen to be trying to get my head around at the current moment.  In fact, at the current moment, my table holds yarn for a sweater I am designing, wool dyed fabrics that I am using to design bags in order to use up the huge mountain of rug wool in the cellar, a coffee cup, a cup full of needles, a thimble and an old fashioned pin cushion.  The fireplace is the only nonfunctional object in this room.  Everything else is both beautiful and useful....even the clock will work if you wind it up.

Picture
This is the non-classroom area of the studio.  This is where the big honking production loom lives.  A loom, sort of like a wood working bench or a table saw, actually takes up about twice as much room as its actual size since you need to have working space all around it.  When this photograph was taken I had just added this beautiful wall of storage and the loom room was looking pretty spacious.  However.....I have fallen backwards in the organization department and currently this room looks a bit...well...let's just say worse.  My estimable assistant Martha Mai is in the midst of organizing me and has made great inroads so that the part of the storage wall closest to the door is, in fact, looking pretty good right now.  I'll post more pictures when she has finished up her organizational magic.

0 Comments

What's Been Going On in the Dye Kitchen

10/25/2012

0 Comments

 
Picture
About a year ago I recklessly purchased about 150 pounds of rug wool from a lovely mother/daughter team that I found on Craig's List.  The price was very good, but 150 lbs of rug wool will make a pile as big as your couch, which was more than I anticipated.  Over the last year I have been making things with the rug wool....things like the braided rug wool baskets, wool coasters, and recycled wool bags, mats and pillows.  And I have also been continuously running some of the rug wool through the dye pots in order to give myself beautiful colors to work with.  Here is some photographic eye candy to show you some of the results.  These photos were taken by my talented assistant and niece, Martha Mai.  She has recently come to help me in the studio, and has been an inspiration.  More on that later......

Picture
0 Comments

Blue Ribbons at the Cumberland Fair!!

9/27/2012

4 Comments

 
Picture
Picture
My spinning group, R&R Spinners, demos at the Cumberland Fair every year.  A request went out to actually enter some of our hand spun, hand knit items in the fair for judging so I ran these two items over.  The silvery shawl in the glamorous studio shot above, is spun from my friend Beatrice's own Shetland sheep and is the natural color of the wool.  This Shetland fiber spun up like a dream so I was able to get a nice fine singles that double plied up to about a fingering/sport weight.  I love this shawl and was loathe to part with it for the week that it will be at the fair, but I sacrificed for my group.

Picture
And here is the second item.  This vest was also spun from local wool that I acquired through the R&R Spinners group. It is a rare and lucky thing to have access to so many fine female farmers and their products.  Living in Portland I am not allowed to have sheep myself, but I am grateful to know some women who have small flocks and are willing to share.  The rosy background color is dyed over a light brown Coopworth, and the contrasting band is made of small samples of mixed local fibers -- maybe 8 half ounce skeins in all.  I love this vest and wear it constantly through the fall, winter and early spring.

Patterns for both will be posted in the near future.  I'll let you know when they go up.

4 Comments

New Clothes for Maisy the Doll

9/20/2012

0 Comments

 
Picture
This is a picture of Maisy the doll.  She is wearing her Christmas outfit and she was actually given to her little girl last Christmas.  Both the doll and the doll mother are named Maisy, and evidently when Maisy the little girl is not looking, Maisy the doll sometimes gets up to naughty behavior that her doll mother (Maisy the girl) cannot really be held responsible for.  They also bear a striking physical resemblance as well as sharing a name.  And evidently changing the clothes around is one of the things that they most like to do together.  This is probably the reason that Maisy's grand mother got in touch with me to see if I could create another outfit so that they could add a little variety to their lives.

Picture
And here is a photograph of the new outfit.  It is being modeled by one of the dolls that still lives with me and consists of a pair of linen overalls, a hand knit cardigan and a winter hat.  I am also going to be posting on the website, and on Ravelry, the pattern for the sweater and hat in case some other doll mother, or grandmother, wants to make them for their own doll children.  These are soft bodied dolls that are approximately 15 inches tall and 10 inches around if you want to make comparisons to your own favored doll child.  And do e-mail me if you would like advice on scaling up the pattern to fit a child as well as a doll.

0 Comments

Taking Joe's Sweater on the Road and also:  Joe's Hat that is the same as Adam's Hat

3/25/2012

3 Comments

 
This is a repost of an entry I did approximately 3 years ago which was, mostly, about the sweater that Joe is wearing.  But there's also quite a bit about the hat....which is exactly the same hat that I made for Adam this fall.  Same construction method, same principle for reduction, but this one is felted so consequently was originally 1/3 bigger and also knit up with a finer yarn.  I believe at the time I referred to it as Joe's Interminable Hat.  I should probably work up an actual pattern for people from Newborn to Big Man size. 
Picture
Joe and I went out for a drive today to look for interesting places to photograph.  As you can see here both Joe and I found a few interesting things.  He is taking pictures with his super hi-price pro digital camera complete with a large pack of accessories and an enormous tripod.  He is taking pictures of the Saco River and I am taking pictures of him -- but I am using my I-Phone.  I wanted you to see the sweater.  I made this for him this winter and it is, I am embarrassed to say, the first sweater I have ever made him.  Since we have been married almost 25 years I have no respectable excuse to give you.  In my defense I did make him the hat.  Let me tell you about that hat.

Picture
He wanted a felted hat that was windproof.  It should also not be the least bit scratchy.  And it had to be black.  I knit that hat out of recycled cashmere and merino (both black) and neither one the least bit scratchy.  Recycled yarn is obtained from unraveling sweaters, so the yarn is fine and crinkly.  Also, in order to felt something to size you have to make it at least 1/3 bigger in all directions than the finished product.  So, between the fine crinkly yarn, the completely black color scheme, the enormous size, the tiny stitches and the complete lack of anything interesting going on in the way of pattern or anything else this hat is the equivalent in interminable knitting of at least one sweater -- quite possibly two.

Picture
The good thing is that he loves the hat and has worn it almost constantly for the last 7 years.  So it seemed he had earned a sweater.  I want to point out the nice way that the cable runs across his shoulders and down the arm.  I believe while I was taking pictures I also commented on how splendid the sweater looked from the back, adding that he always had a very nice rear aspect.  That is what elicited the look that you see here.  I believe he is wondering what exactly I might be implying and, perhaps, how best to follow up.

3 Comments

What I did with the Knitting Sample or My New I-Pad Cozy

3/22/2012

0 Comments

 
Picture
If you look at the entry below you will see that I saw my friend Berta's Pinterest posting for an afghan design that she wanted to try....if she could only find the pattern.  I took a look....it was a slow rainy Sunday afternoon with lots of sitting around watching movies in the plan, so I grabbed some scrap yarn and gave it a shot.  This is what I came up with, and the pattern to make these little squares is available to you in the entry that I made just prior to this one.

Picture
I ran out of the variegated yarn after I had completed 6 squares, although there was still plenty of purple left.  So I left it laying around for a bit on the table in the studio, which is my favorite spot to leave things that I want to think about for a while.  It occurred to me while I was watching a Netflix movie and knitting that the size of the knitting sample was almost perfect for the side and fold over section of the I-pad.  So I knit an I-cord border around the whole thing and then used some of my ENORMOUS stash of rug wool to make an I-Pad cover sleeve which I then sewed the knitting sample to as a kind of decorative cover/extra padding.

Picture
As you can see here, I also added a little pocket at the base so that you can roll up the whole shebang, tie it off with the green ties and have your I-Pad at the perfect level of Prop for reading or viewing.  Plus I find that when I sit down to read a nice novel with my cup of tea the customary I-Pad covers are a little....technical in feel.  This knitted, wool backed cover gives the whole experience a nice, cozy, nestling in feel that is more conducive to maximum relaxation...at least for me.

0 Comments

Pattern for Scrap Yarn Bow Tie Pattern

3/11/2012

0 Comments

 
Picture
My friend Roberta posted a picture to Pinterest under Things I Want to Try.  I looked at the picture and shot her an e-mail offering to write up the pattern so that she could try it.  This is a photo of my version, using the scrap yarn that I had on hand.  I used a worsted weight yarn and a size 5 needle.  This would be a great pattern to use as your Carrying Around Knitting, particularly if you do the Bow Ties in Stash Scrap Colors (or hand dyes, or handspun) and use a unifying color like black, or white, or grey, or brown in the place of the purple.   I recommend that you just carry around the directions for the Bowties and wait until you are sitting down at home to knit up the little quadrilateral Inserts and do the sewing up while you are comfortable.

Picture
Bowtie Pattern:  Cast on 20 stitches using a flexible cast on method.  I Knit On myself, but any method that doesn't result in a hard stiff edge is fine.  Knit one row.  At the beginning of the next 12 rows Slip 1, Knit 1, Pass the Slip stitch over, Knit to the end of the row.  You should have 8 stitches on your needle.  Slip the first stitch and knit to the end of the row for the next 16 rows.  Now to do the last increasing bit.  Knit into the front and back of the first stitch and then knit to the end of the row for the next 12 rows or until you have 20 stitches on your needle.  Bind off with a flexible bind off method.  This is a good one.  Knit 2 stitches then insert the tip of your left hand needle back into the 2 on the right hand needle and knit them together.  Knit another stitch.  Repeat.

Picture
Quadrilateral Insert Pattern:  Once you get a few of the Bowties done load up a movie or your favorite music and start to knit the Inserts and assemble your squares.  Cast on 20 stitches and knit one row.  Knit 2 together at the beginning of the next 12 rows.  You should have 8 live stitches left on your needle.  Break off the yarn leaving about a 20 inch tail which you thread onto a darning needle.  Sew the live stitches down, one at a time, to the straight edge at the narrow part of the Bowtie.  Use a mattress stitch to join the angles of the Bowtie and the Insert together.  Use the bit of yarn left from when you cast on to sew up the other angle.  Repeat for the other side, and then over and over as many times as you have little Bowties.  Sew the squares together using a mattress stitch as well.  The mattress stitch keeps things flexible....you don't want hard edges....everything should be kind of stretchy.

0 Comments
<<Previous
Forward>>

    About Martha


    The Threads of Meaning is a collection of my hand made creations and the materials I use to make them.  I quilt, sew, spin, knit, crochet, weave, make dolls, rugs (hooked and braided) and tat. I have had articles in Art and Antiques (May 2001) and American Quilter (Ultimate Projects 2004). I have sold work to the State of Hawaii and some very dedicated private collectors. I dye my own fibers and use vintage and new materials. I tend to prefer traditional techniques and natural materials used in innovative ways.

    Archives

    February 2019
    November 2018
    October 2018
    May 2016
    February 2016
    January 2016
    October 2015
    February 2015
    October 2014
    June 2014
    April 2014
    March 2014
    February 2014
    December 2013
    October 2013
    August 2013
    July 2013
    June 2013
    May 2013
    April 2013
    March 2013
    February 2013
    January 2013
    December 2012
    November 2012
    October 2012
    September 2012
    March 2012
    January 2012
    December 2011
    November 2011
    October 2011
    September 2011
    August 2011
    July 2011
    June 2011
    May 2011
    April 2011
    March 2011
    February 2011

    RSS Feed

    Categories

    All
    Materials & Supplies
    Pattern
    Quilts
    Studio Whims

Threads of Meaning LLC
Photo used under Creative Commons from anemoneprojectors (through the backlog)