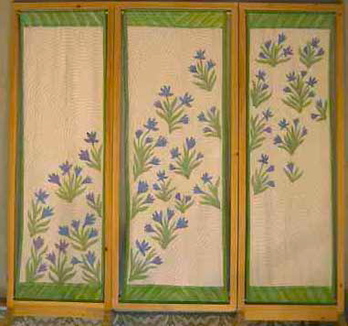
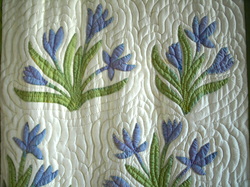
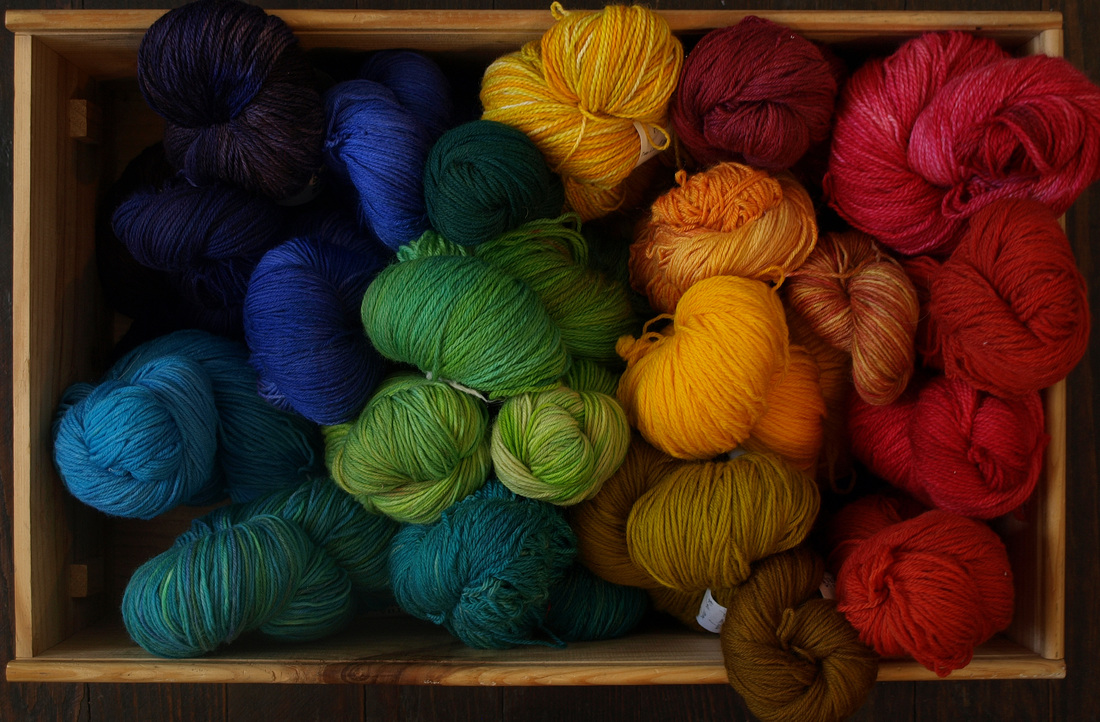
As the Maine winter goes on, and on, and on I find myself longing for spring. The fact that I have been working up Hawaiian Applique designs for my upcoming OLLI class has intensified the longing. These images are not, strictly speaking, Hawaiian Applique but rather a use of some of the techniques to work up a Maine crocus. The title of this screen is Merrymeeting Spring and was co-created with my father 12 years ago. He designed and built the frame in Maine while I made the panels in Arizona. They came together for a show at Scott Potter's gallery in Portland Maine. 
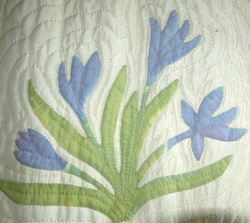
These crocus flowers are the first green things to poke their heads up through the snow at this time of year and I lived, for several years, in a house that my father built on Merrymeeting Bay in Topsham. I was thinking about those years when I made the panels. And now, when I look at the screen in my studio I think of my father. Having a piece like this that we created together is almost like having him in my studio. I remember his hands and how they looked working with his tools. The work that his hands did, that my hands do, the work that any of us create contains a whisper of who we are and can hold and pass on that whisper indefinitely.
0 Comments
Here is a close up photo of my big washtub full of delicious color and softness. Most of these hand dyed and hand carded rovings are 2 oz or perhaps a bit more in weight. They are the perfect antidote if you have been spinning up your large natural color roving all winter and you are getting weird mid-February longings for color -- any color -- as long as it is not white, grey or brown. There is enough fiber here to spin up the necessary to make up the Steam Punk Mitts, which would give you a color break from spinning, a quick knitting project, and some nice warm mitts in a bright color to get you through until spring. The Roving and the pattern can be found on Etsy. These socks, which I made for my sister Peg for Christmas, are the Mamluke Socks from Nancy Bush's excellent book Folk Socks. If you click it you will go to the Ravelry site for the book, and there you will be able to see what a dramatic difference yarn choice can make with this particular sock pattern. If you make it up in blue and white, for example, it will look quite a bit different than this version which is made up of five different colors of my hand dyed sock yarn. I like to use up odds and ends in these Fair Isle type projects which makes for a lot of variety and, in my case, requires me to knit socks two at a time so that they will match without any needless anxiety of the "do I have enough of this color" sort. These are my Stained Glass Mitts, the pattern for which will be available as soon as I figure out how to use my color graphing software. I like to use the sock yarns for socks, obviously, but I also like them for gloves, mitts, and mittens because what you wear on your hands tends to get grubby and the sock yarns are washable and abrasion resistant because of the addition of a little bit of nylon to the mix. I also like to use the Hand Dyes for baby clothes. There are several of reasons for this. One, the superwash merino is smoother than non-superwash and this makes for a more baby skin friendly garment. Also the washability is a boon to mothers. And I also like the colors. Most babies, I find, seem to call for stronger, bolder colors than the traditional pastels. As you can see in the picture below, baby Nico is a take charge kind of guy with strong opinions of his own and a soft baby blue just wouldn't express his inner Nico-ness like these rich bold colors do. If you would like to acquire some of these hand dyed sock yarns to enliven your own stash hie yourself over to my Etsy site and take a look. I was thinking about Valentine's Day and came up with these three pretty things. They are made from the bottomless pile of rug wool, some of which has been overdyed, stuffed with wool and a little lavender packet, and finished off with a little embroidery and a loop for hanging in your window, from your cup hooks in the kitchen, or in your closet where the lavender will make things smell lovely. I also want to talk a little bit about the way I work and how I source my supplies. The red rug wool was given to me by someone cleaning out their aunt's barn, the embroidery floss came from my big box of embroidery materials that I periodically replenish although I often get given things there as well. The wool for stuffing came from Bella the lovely sheep who has now passed on to that lovely meadow in the sky. The lavender was purchased in Virginia from a friend who had a lavender business and I made the little sachets from some of the many, many gauze curtains that were in the house when we bought it 4 years ago. So I would like to express my gratitude for the materials that people have given me. I'm sure they were thinking something like, "Good heavens, here is this big bag of (xxx) that I have to do something with.....who would want this, who???" And then they go, "Oh, Martha, she'll think of something to do with it!" And they hop in the car, or truck, depending on how big the bag of something is. I greet them with smiles and gratitude and coffee and I carry the big bag down to the dye kitchen, or into the loom room to sort and put into the cubbies. And quite often I'll have something for many years (like the lavender) before I find a real use for it. The nice thing is that when I do use it I always remember where I got it, the person who thought of me, the day when I overdyed it. In short, most of my materials are permeated with gratitude, fond memories and creative inspiration. Which is why they are Threads of Meaning. I have just finished up with my latest batch dyeing of the sock yarns. All of my colors are OAK (One of A Kind) because I have a tendency to overdye colors that I think need improvement rather than starting with a white base yarn like most hand dyers do. It's a kind of upcycling for me. Consequently the colors tend to be created according to whim rather than carefully measured and reproducible formulae. These gloves and mitts that you see below are knit up from some of the hand dyes and the pattern is available for purchase here. The yarns are for sale as well and you can find them on my Etsy site. I also like to use the hand dyed sock yarns for baby things. The superwash merino is very soft and it's also washable which is a nice thing for the baby's mother. I also like to knit baby things in not so baby colors. The prototype for this little sweater and bonnet were made for the baby of my niece and she was pretty opposed to pink. She was delighted with this color combination and the baby was beautiful in it. I don't have a photograph of the baby, though, so you have to be satisfied to imagine the baby's head in place of the purple ball. The pattern for this sweater, which is quite a relaxing knit being mostly garter stitch, is available here. My Shopping Shawl Pattern will be appearing in a joint venture with Peacefleece this spring, which prompted me to leave Portland and drive up to Porter Maine to visit the base of operations. I first learned about Peacefleece 15 years or so ago when I was living in Hawaii and we had to order some wool yarn for the Waldorf School knitting classes. I was very pleased that we were ordering yarn from Maine, but when the package arrived I was thrilled. The yarn was gorgeous and the "business plan" of this company was so inspirational. I am not going to try to explain it to you here; go to the website and read for yourself. I don't think I could do it justice. The idea of creating personal relationships across geographical and political barriers, and having those relationships be an integral part of a business; the concept of using your business to increase the goodness in the world in many small ways, really took hold of my imagination. I believe that the foundation stones of Threads of Meaning were laid in Kea'au Hawaii when I opened that box and read the little folder that Pete and Marti Hagerty had included. Yesterday, while I was watching the snow fall all day long through the studio window while I was sitting warm and snug inside I caught sight of this beautiful red hand dyed alpaca/wool blend. I only had one small ball left. What to do? What to do? Then I remembered that I had one small grand nephew, my friend and relative Waits, who was in need of mittens. Kismet -- it was meant to be. These are knit using my DNA mitten pattern, which is what I use when I just want to make mittens without too much heavy thinking. You can see the pattern in the post below. I subscribe to Piecework online and it comes to my I-Pad every other month. This month there was an article on Harriet Prescott Spofford and Women's Work in Nineteenth-Century New England. There is a secondary article on 1861 Cottage-Industry Mittens and Wristers which talks about the cottage industry of mitten knitting that women used to augment the family income at that time -- particularly in New England and even more particularly in Maine where the need for "the most common style of mittens, made from homespun or store-distributed yarn and sold to village stores to supply farmers, lumbermen, and fishermen" (p. 50, Piecework Jan-Feb-13) was almost universal. In Maine during the mid 1800's the vast majority of men were either farmers, lumbermen and/or fishermen. I read through the pattern provided for these basic mittens and was overwhelmed by a strong feeling of deja vu. The construction techniques, from the K2P1 ribbing, to the purl stitches at the edge of the thumb gusset (see it on the yellow mittens above) to the closure on the thumb and at the top of the mitten were exactly as I had been taught to make them when I was five years old and made my first pair for some lucky part of our big Maine family. These mittens, which I can easily make for a child or a woman in a day without even making a dent in my ability to pay attention to something else were showing up in this national publication. It was like seeing a picture of your great-great-grandmother on the cover of Time Magazine. I immediately called my mother, who taught me to make mittens, to follow up. "Who taught you to make mittens?" I inquired. "Why my mother I expect," she said. "And who taught her?" I wanted to know. "Well, her mother. Or her Grandmother Adeline -- you know Grammy Staples." Adeline lived in Calais Maine in the mid 1800's and had a large farm family of 9 children. She knit constantly and I have, through Nana who is my great-grandmother, the double pointed knitting needles that she used. They are steel with different kinds of points ground onto the ends, and of various lengths from 9 inches (for mittens, hats and socks) to 22" (for circularly constructed sweaters like Ganseys). I have used the 9 inch ones many times and they are my go to needles for what I call VooDoo socks which I generally make for wedding presents -- one pair for the bride and one for the groom -- because of my feeling that it knits the new member into the family. I have been really moved emotionally by reminder of how old some of my knowledge is, how far back it goes, and the lifestyles that created it. I am going to my big bowl of handspun yarn right now to dig through and look for appropriate yarns to knit up a pair of mittens and wristers for my son. And I will be using Adeline's needles. DNA Mitten Pattern I have been knitting since the age of 4. We had a big family with many children in Maine, so one of the very first things I learned to knit was mittens. I am going to try to analyze and clearly describe a process that is encoded on my DNA, hence the title. This is a basic, solid color mitten with no tricky pattern stitches or other flummery. You can add that to your future efforts once you have made a pair or 10 of the basic sort. These make excellent Christmas gifts for children. I often make them in sets of 3 so that a lost mitten is no catastrophe. If you have never made mittens before I recommend that you make the first pair for yourself. This is mostly because you have your hands right there in front of you, knitting , and that makes them handy for trying on and test fitting. Once you are familiar with the process you should be able to grade the whole business up or down to fit hands that may or may not be right in front of you. For the purposes of general descriptions these are the approximate measurements for mittens above the line of the cuff for the various sizes of human beings. Child Small - 5 inches around and 5 inches long Medium - 6 inches around and 6 inches long Large - 7 inches around and 7 inches long Adult Small - 7 inches around and 7 inches long Medium - 8 inches around and 8 inches long Large - 9 inches around and 9 inches long Now your human beings may come in non-standard sizes with long narrow hands, or wide baseball mitt shaped hands so accommodate to your people, don’t blindly follow the measurements. One of the advantages of hand made as opposed to mass produced mittens is that you can make your mittens one at a time to actually fit the person, who has also, usually, been made one at a time. First question.....what kind of yarn are you using? If it is worsted weight then you will get approximately 5 stitches per inch. If it is DK or sport weight then you are probably looking at 6 or 7 stitches per inch. If it is fingering or sock weight yarn then we are talking about 8 or 9 stitches per inch. The weight of the yarn has more to do with the gauge then we usually think, and the needle size has less. Mittens are best when knit at a fairly close tension so use a smaller size needle then you usually would. Here is another general list. Worsted Weight - needle size 4-7 DK or Sport - needle size 3-4 Fingering or Sock Weight - needle size 0-3 I’m going to assume that you are knitting your mittens on double points since that is the way it is traditionally done. It can be done on two circular needles, or one long circular needle either singly (one mitten at a time) or for the adventurous doubly (two mittens at a time). I am going to assume that with your first pair you are not going there, although it does give you something to aspire to. Work up your gauge. Cast on 20 stitches and knit on the front, purl on the back side for about an inch or so. Now measure how many stitches you are getting to the inch. This is your key number which we will abbreviate as N. If you are using worsted weight N=5 in all probability. Take your number N (I am going to assume it was 5) and multiply that by the number of inches around your hand (I am going to assume 8 for Adult Medium). Multiply N by your measurement to get the approximate number to cast on. (5x8=40) Making the Cuff Fudging takes place here. I like to use a Knit 2 Purl 1 rib on my mittens for the cuff. This rib is stretchier and allows for a little elegance of construction when we do the thumb gusset later so just go with me here. 40 is not divisible by 3, but 39 is. I would cast on 39 stitches and Knit 2 Purl 1 for one row. Do not join first as you usually do. This creates a little ridge for your first row that makes it easier to join without twisting because you can see what you’re doing. Now place 13 on each needle and join. I like to start every needle with a knit stitch because it makes the knitting of the cuff more automatic pilot for me and requires less paying attention, so do that too. So now we have 39 stitches in all, split into 13 stitches on each of 3 needles, each one beginning with a Knit 2. Do Knit 2 Purl 1 ribbing until the cuff is as long as you want it to be. For children 2-3 inches is usually good, adults may want it a bit longer, say 3-4 inches. Setting up for the Hand and Thumb Gusset We are now going to divide our number of stitches roughly in half. We will reserve 20 stitches for the front of the hand, so place 20 stitches on one needle. Split the other 19 roughly in half, placing 9 on the first “short” needle and 10 on the other, but pay attention to where your Purl and Knit Stitches are. We want to have a Purl 1, Knit 2, Purl 1 section at the beginning of the 9 stitch needle. We are going to use that section to make the thumb gusset and if you do it my way you will have an elegant line of purl stitches that goes all the way from the base of the cuff up each edge of the thumb gusset. It is a small thing that in no way affects the utility of the mitten, but it amuses me so I am telling you about it. From now on all stitches will be knit with the exception of the Purl stitches on either side of the thumb gusset. Beginning with the 9 stitch needle and a purl stitch, Purl 1 Knit 2 Purl 1 and then knit until the first round is completed. You may want to increase up to 4 stitches in this first plain knit row, depending on the shape of your hand. A long narrow hand won’t require any increasing. A broader hand with a narrow wrist would benefit from a few extra stitches above the cuff. Continue knitting around and maintaining the Purl 1 Knit 2 Purl 1 base for the thumb gusset for 2-4 rows. Now we are going to start increasing for the thumb. Thumb Gusset Maintain the purl stitches going all the way up the edges of the gusset. Row 1 and all odd number rows): Purl 1 Make One by knitting into the stitch below, and then into the stitch on the needle. (Right handed make one) Knit whatever is in the middle here which on row 1 will be 0, on row 3 will be 2, on row 5 will be 4, etc., etc. Make another one by Knitting the stitch on the needle and then into the stitch below (Left handed make one). Purl one. Knit plain for the rest of the row. Row 2 and all even number rows. Knit all knit stitches and purl the two stitches on the outside edges of the gusset. Do not increase on even number rows. Keep this up until you have increased 10 stitches and there are 12 knit stitches in all between the purl stitches on the outside of the gusset. Run a length of contrasting yarn through these stitches to hold them and cast on 4 stitches to close the gap. Now just knit around until your mitten is an inch or so shy of your final measurement, in this case 7 inches above the line of the cuff. Setting up to decrease for the top of the mitten. Check your thumb position. Look at your the hands palm up. When you are looking at the palms of your hands, or your mittens, the thumb is on the right on the right hand, and on the left on the left hand. Place your stitches so that you have half your stitches on one needle for the front of the mitten and the thumb gusset is on the right side for the right mitten or on the left side for the left mitten. This may require some initial fussing around with your double pointed needles to get things placed properly. Just move your stitches around until you it is correct and then place your 4th double pointed needle wherever it needs to be in order to begin to knit again. Knit 1 round ending up on one side or the other of the front of the mitten. You should have 1/2 of your stitches on one needle, and 1/4 of your stitches on the other two. Round 1 Side 1 - Knit 1 stitch, PSSO (this is done Slip 1, knit 1, pass the slipped stitch over the knit stitch -- henceforth referred to as PSSO), Knit until you are within 3 stitches of the end of this side. Knit 2 together, Knit 1 Round 1 Side 2 - Do the same thing. Round 2 and all even rounds - Knit all stitches Round 3 and all odd rounds - Same as round 1 You will notice that on the odd number rows you are decreasing a total of 4 stitches each time. When you reach the point when you have 6-8 stitches left on each side you are ready to close the top of the mitten. You can Kitchener stitch it together which is what I do because it is tricky and looks good. You can do a 3 Needle Bind Off. You can just cast off and sew the top of the mitten together. If you decide to Kitchener stitch the tops together then just put the first mitten’s top stitches on a length of contrasting yarn and complete the other mitten so you can finish them both at once. It is easier to remember how to Kitchener stitch when you are doing both at once rather than one, and after a long time passes, another one. Finishing the thumb Pick up the 12 stitches on your thumb, and then pick up 4 more where you “cast on 4 stitches to close the gap”. Spread them out with 5 stitches on each of 3 needles, knitting two together where necessary to close up the little hole that is always cropping up at the base of the thumb join. Knit around and around until the thumb is long enough, approximately 2 inches for adult medium, but thumbs differ so feel free to try the mitten on to check. Closing off the top of the thumb. PSSO at the beginning of each needle and K2tog at the end of every needle. You should have 3 stitches on each needle now. Slip 1, K2tog, Pass the slip stitch over on each needle. You now have 3 stitches left, 1 on each needle. Break off the yarn and, using a darning needle, thread through the middle of each stitch and pull gently to close up the hole. Work your end in and cut the tail of yarn off so it doesn’t hang there foolishly. After the Holiday Fair on Munjoy Hill I then organize myself and start the annual posting of things on Etsy. Today I started with the dolls. Every year I make 12 dolls, take them to the Christmas Fair, and then put the rest online so that they can find good homes for themselves. I did this starting almost 20 years ago when the Christmas Fair, for me, was in Hilo, Hawaii instead of Portland Maine. I started making dolls in Hawaii when Devan was six years old and this little face on the left makes me nostalgic for my own little girl, and for the island breezes that blew over the land we owned when we lived there. These dolls are a real labor of love, which is why I only make a few of them a year. I don't want it to turn into a production kind of task. I like to hand stitch them one at a time, from hand dyed, natural, and vintage materials, and to pay attention to each face as I finish. I sew the dolls all by hand, or on the antique Singer treadle machine that you see in the picture at the top of this posting. This is the same machine that I used in Hawaii and it belonged originally to Joe's great-grandmother Annie. We took it to Hawaii when we moved from Topsham, Maine because we knew we'd be off the grid and the treadle is a wonder of mechanical advantage with no electricity needed. This doll to the left is an Asian inspired doll, with a long black braid down the back. That is why I have her dressed in this linen and silk kimono style jacket and posed with these Mongolian boots. She is standing in front of one of my Hawaiian quilts and on top of the cabinet of the antique Singer treadle machine. And this little Penny Person is the only one remaining from the collection that I took to the fair on Munjoy Hill. She is looking for a home for the holidays and you can find her on my Etsy posting at this link. Penny Person I call them Penny People because they are made from the scraps left from making the bigger dolls, they are tiny (only 4 inches high), and because they have an actual penny sewn into the bottom so that they are flat and heavy enough to stand up. I'll be posting some more tomorrow, and maybe some of the bears if I get ambitious. Pictures for you of the first night of the SEA Holiday Sale at the East End School on North Street on Munjoy Hill. I will be hanging out there all weekend -- today until 5:00, tomorrow until 4:00 -- spinning and chatting and generally having a good time. And here is a picture of the dolls, the rug wool, the Penny People and some hand dyed mohair yarn, all of which has been beautifully displayed by the Amazing Martha Mai. She will be at the booth with me for most of today, and part of tomorrow. And lastly a picture of the Amazing Martha Mai -- who is working with me in the studio now and has been invaluable in pulling things together. She is talented, creative, an amazing photographer and extremely adept at managing and organizing her Auntie (that would be me). The whole experience of getting ready for this fair has been greatly enhanced by her presence. She is a blessing -- and we have plans, big plans for the Studio for 2013. |
About Martha
Archives
February 2019
Categories |